i absolutely love fall fashion!! i feel like every year my wish-list for the new fall fashion trends gets longer and longer! this year i put together five looks that i absolutely LOVE and then i can narrow down what i need after i see what i want mysel...
DIY Lace Cuff & Ring
DIY8 Comments
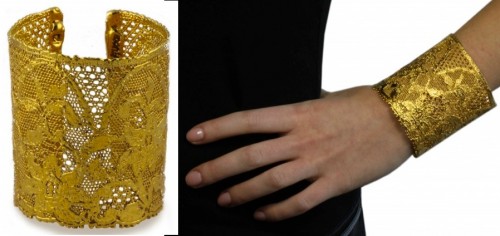
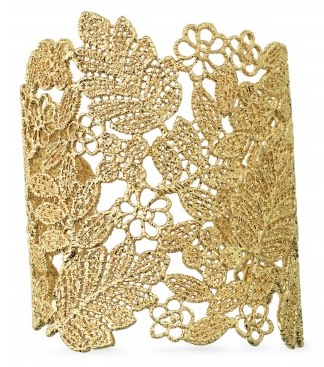
Lace jewelry is a hot trend for fall, and we love the look; so creating a DIY lace cuff and ring was a fun challenge for us. We knew we had to make the perfect ones for you to try at home and we think we nailed it. Let us know what you think after you try it! Our inspirations:
24K gold plated Doroty cuff in gilded lace by Monika Knuttson, gildedlace.com, $700-$800.
Stella & Dot Chantilly Lace Cuff, $98
Our DIY lace cuff and ring (because we had to give the ring a try too) exceeded our expectations! We learned a few tips along the way to make it easier for you, and easier for our next time, because we definitely will be needing a silver cuff and silver ring.
The result -- our DIY gold cuff:
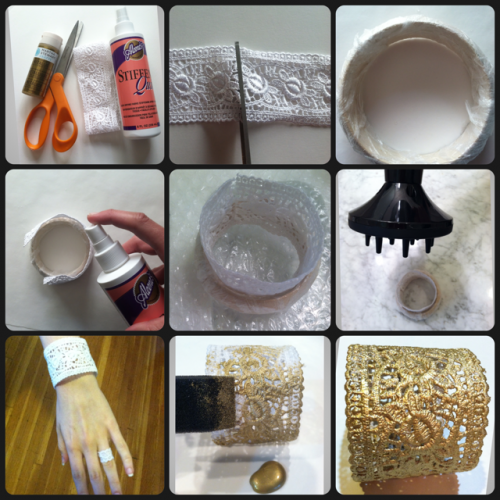
Tutorial:
Step 1 - Gather supplies: Fabric stiffener (usually found with glues at your local craft store), scissors, lace (found in the trim section)
Step 2 - Cut your lace to length that will fit around your wrist. You can always cut it shorter later.
Step 3 - Lay plastic down on your work surface and wear gloves. We wrapped a bangle with plastic wrap and used it as the form for our cuff.
Step 4 - Spray fabric stiffener on the lace and let dry. You may want to use your hands to work the fabric stiffener into the lace.
Step 5 - Dry fabric in shape you want it to become! We used the inside of our bangle because it was the perfect size and held the lace in place without bending it.
Step 6 - Tip #1: use a blow-dryer after spraying to speed up drying time!!
Step 7 - While the lace is still pliable, make sure it fits! It's still adjustable while you are repeating steps 4-6. Keep repeating them until the lace becomes hard. The lighter weight the lace, the quicker it will dry and the fewer times you will have to repeat these steps. (FYI: Our ring took 4 repetitions and our cuff took 6. Tip #2: One option we might try next time is to place a velcro dot as a closure with the lace just overlapping on our wrist.
Step 8 - Paint your cuff and ring with your choice of color. We chose Martha Steward Crafts Multi-Surface Metallic Acrylic Craft Paint in Gold.
Step 9 - ENJOY!
How to Survive High School: Tips on Taking Pictures
BEAUTYComment
Hannah Margaret is a Zooey Deschanel look-alike, college student, our guest writer, and blogger at hm. ~~ Your “How to Survive High School” today could be a valuable lesson I pass on to you darling ladies, but this will not be one of them. This is a ridiculous (but useful, in my opinion) tidbit on how, when, and where to take pictures. Tips on taking pictures, now, more so than ever, are crucial to our day-to-day lives and I want to show you the best way to harness the power (I feel like there is a superhero reference to be made here). The value of capturing a memory, especially in such an exciting time of life, is vital. Taking photos is the best way to remember your High School years and here are some ways to remember your years in hilarious, fun, and classy ways because, get real, these years are, in fact, hilarious and fun (and we need to remember to stay classy). 1. First and foremost, a warning: Utilize your social networking outlets with care. You must share with the awareness that the public, the creeps included, will see what you're posting. So share with caution. After you take that into consideration, post photos of fun and interesting things you're doing. Keep the selfies to a minimum, because it can after all, send the wrong message. I suppose the key here is utilize but don't bombard. Instagram is my utmost fave in the realm of photo sharing.
2. My favorite: do the jumping picture. As a senior in college, a brilliant, random jumping photo sounds perfect to me, but I just shouldn't. I've outgrown it. Jump while you still are young enough to do so! Some of my highlighted memories as a high school student were times when I jumped for the camera. I got busted for doing in London this February. It was cute but it was too much for a mature young woman like myself (complete sarcasm).
3. Take too many photos at events, especially football games. In my mind, there is nothing more American than a shot of some school spirited buddies, enjoying those Friday night lights. I cherish all those memories. Also, sleepovers are included events. The goofy, absurd photos I took in the wee hours of the morning are my favorite. They are terrible but hilarious. Do it, you'll love it later on.
4. Print your photos and either a.) bulletin board b.) frame c.) scrapbook or d.) collage them. I know that this seems obvious it you'd be surprised. I've lost many photos because I haven't printed them and they get deleted or something else tragic happens. I don't even mention the idea of my computer crashing. Also, this allows all you artsy folk to display your masterpieces.
Ultimately, now is the time to document and record. Now is the time to have silly and goofy moments and to have cute and crazy outfits. I am desperate to be where you darlings are because it is so fun. So remember that and have blast! xoxo
~By Hannah Margaret Allen. For a fantastically great posts and a well-traveled blog adventure, check out HannahMargaretAllen.blogspot.com


