Popcosmo

a blog for everyone and their mothers

Black and white floral

FASHIONKim & Chloe22 Comments

When I was a teen, I slipped on my brand new muted pink and green floral blazer so I could look just like Molly Ringwald in the picture below. Feeling the silk lining brush my skin, I didn't worry that the color wasn't the best for me and would probably look better on a blonde and best on a redhead. Practicalities didn't matter, since sliding one arm in was halfway to channeling Molly Ringwald. Twisting and turning to ease my other arm into the jacket, hiking it up so the arms were just so, and channeling my best pout, I "was" her. Until, very quickly, realization set in that I couldn't channel someone else by wearing similar clothes. Lesson learned!

And I can tell you that florals were waaay out of my comfort zone - I think I wore the blazer only 2 or 3 times, mostly out of guilt. I have definitely realized solids, and very occasionally stripes, checks, or plaids are not only easy for me, but when cut well can be divine. Textures, subtle weaves, and solid construction in fine fabrics are my siren's song.

But this black and white floral skirt sang to me, probably because the color palette in an oversized pattern, resulting in abstraction of a floral print. Adding some stripes and my ever-loved booties to keep the floral casual, I had an outfit that felt not so floral, but all me. But black and white without an accent can seem a bit dull, so I needed just a splash of color.

Thanks to Kluster Shop, I now have a versatile necklace I'll be sharing with Chloe when I need a pop of color married with a deeper color for texture. The grey highlights the black and white, but the turquoise is what gives the outfit the pop it needed. I'm looking forward to all the ways I can wear this necklace: wrapped, long, as an accent or with complementary colors. Thanks again Kluster Shop for creating a stunning piece that we both adore!

necklace: Kluster Shop (c/o) | sweater: Agnes b. old (similar) | shirt: Madewell | skirt: Zara (similar)| booties: Rag & Bone

What is something you thought you couldn't wear... but surprised yourself by wanting to wear or actually wearing?

DIY Love Sign

DIYKim & Chloe40 Comments

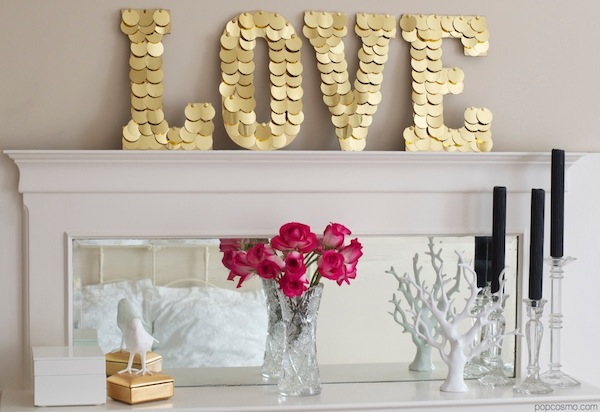
Love Sign DIY Chloe's on a room-cleaning spree... yippee! And part of her new clean look was the desire for a new mantel design, including a love sign. You've seen our past room designs for her, but she's seriously decluttering - again - and wants a look that is simple & elegant, with a little bit of funky. Maybe it's the fall weather and there's such a thing as "fall cleaning," but I asked no questions and she's on a roll!

There are no big changes in the air, just simplifying a bit, but for the mantel, she wanted to replace her monogram message board with a love sign by PocketfulofDreamsUK's but we didn't want to spend $400. So, it was time to be inspired and DIY! We were surprised how easy this project turned out to be, and are already thinking of other projects similar to her new love sign.

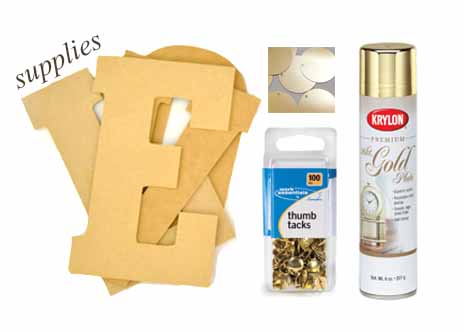
DIY love sign supplies

Supplies:

  • wooden letters *
  • gold discs - we used 40 mm sequins
  • gold thumb tacks
  • gold Krylon paint

love sign mantel

Steps:

1. Sand and prime your wooden letters. Then spray them, making sure to cover sides as well.

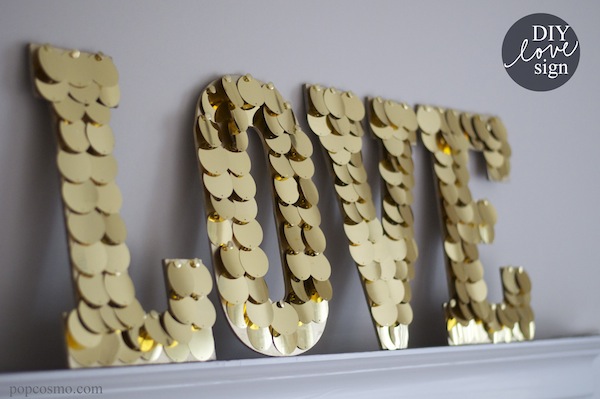
2. Starting at bottom, cover letters with discs and thumb tacks. Push thumb tacks 1/2 way the top hole only in so discs can move freely side to side (movement gives it a 3-dimensional quality that makes it more interesting).

3. Add a new row directly above the bottom row, covering the thumbtacks. Where possible, keep the columns and rows straight.

Can you believe - that's it! The only tedious part is that it takes some time to push the thumb tacks in (my thumbs actually got a little sore, so I used a thimble). Other than that, this is a very simple project. Consider it a weekend undertaking and catch up on some movies, football, or a tv series. I have a few I can recommend - any you are liking lately?

* {update 2/19: it seems the wood we used may have changed and it's become almost impossible to push a thumbtack into the wooden letters! If you can't test a thumbtack discreetly before purchasing (in a spot that would not harm it for another purchaser) then we suggest using the exact same idea on CARDBOARD letters. The shape is plainer, but the insertion is easy!}

IF YOU ENJOY THIS: check out our Disco Love Sign & Glitter Lollipops

#ChicChat

BLOG TIPS, EXTRASKim & Chloe7 Comments

Join us on Twitter every Tuesday night from 9-9:30 EST for a brand new chat: #ChicChat! I'll be chatting about teen blogs and blogging... and more! Our goal is to have a chat for teens to collaborate, learn, share knowledge, and develop relationships with fellow teen bloggers.

October 1: Introduce your blog and yourself. Why did you start blogging and what are your goals? Let's visit each other's blogs comment on each other's posts!

October 8: What has been your most popular post? What post should have been popular? Don't be shy! We want to learn from each other - what worked and why? What post surprised you, disappointed you?

Looking forward to chatting with you, just use #ChicChat and you'll join us! Also, follow us on Twitter (@popcosmo) and let us know you'll be joining so we can send you a reminder!

If you want to learn more about Tweet Chats, check out the who, what, when, where, and why's here!

xox ~chloe