Popcosmo

tech

Podcasts

BLOG TIPS, EXTRASKim & Chloe2 Comments

_DSC0028Hello lovelies. I'm probably the furthest thing from a trendsetter. I'd definitely call myself a trend follower before I would dream of calling myself a trendsetter. I never know what "the next big thing" is going to be, and frankly I'm totally ok with letting other people do the figuring out. However, I totally called it that podcasts were on the rise. I knew they were going to be big, and they really are starting to be hot and trendy... at least I think they are. So go me for being ahead of the curve. For once. Pats on the back are well deserved in my book.

_DSC0025

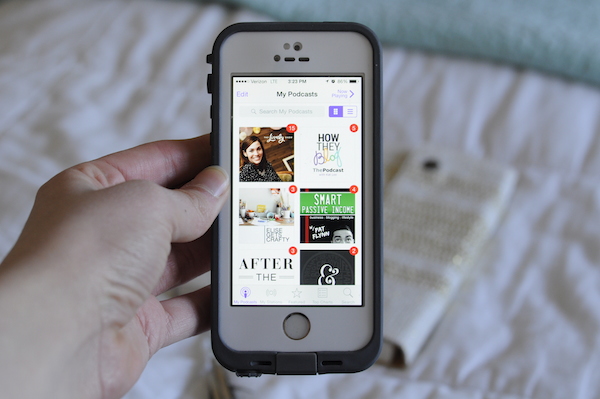
As you know, I just got my wisdom teeth removed. I haven't been able to sleep so well with all the medicines that I have been taking, so I popped on a podcast and it was an instant soother. It was also an inspiration kickstarter. I love listening to the radio (i.e. some segments on NPR) but being able to choose the topic of the podcast makes it all the cooler. I decided to compile a list of podcasts that I've recently discovered regarding blogging and creative inspiration. I haven't listened to all of them and some of them I just downloaded like .02 seconds before writing this post so bare with me.

_DSC0035 Here's my list:

  • The Lively Show
  • How They Blog
  • Elise Gets Crafty
  • Smart Passive Income
  • After The Jump
  • Seanwes Podcast

I have an iPhone and simply downloaded these podcasts through the Podcast App on my phone. It was super simple and each of these podcasts listed are free which is an added bonus! Let me know if you listen to any of these podcasts or if you have any that you listen to currently that I should add to my list.

Also, just for the heck of it, let's play trend spotter. Do you know of anything that's going to be "the next big thing?" I'd love to hear it! xox, Chloe

oh app-y day

EXTRAS, RANDOM STUFFKim & Chloe6 Comments

fave apps Life is like the App Store, there’s a million options you just have to know which ones to download. If you don’t think that metaphor makes sense then we can’t be friends, just sayin’. Just kidding. Well half kidding. Anyway. Moving on.

I recently upgraded from the old iPhone four (sans Siri) to the brand spanking new iPhone 5. The gold one. That has Siri. I’m feelin’ fab. Since I upgraded to a new phone I decided that I should also upgrade my apps. Out with the old (ie Temple Run and Angry Birds) and in with the new. Today I’m going to share my top three new favorite apps. I’m actually obsessed with them and you will be too. Ok ready? Here they are in no particular order…

1. Evil Apples: If you’re an Apples to Apples fanatic like me, then this game is a must download. I have my seventh period off and my friends and I all go to the same room to “do homework” which usually ends up in us playing a highly competitive game of Evil Apples. It’s basically Cards Against Humanity in app form. Seriously the bomb diggity. 2. Riffsy Keyboard: I found this app through Man Repeller and haven’t looked back since. It’s basically a Gif Keyboard. It works like emojis so the gifs are always at your beck and call. They’re almost too convenient if that’s possible. Go read this post to find out more! 3. Yik Yak: As you might know, I’m a senior in high school and I’m in the whole applying to college process. It’s stressful, and it’s not fun. My future is literally on my kitchen table. However, the idea of college is fun. My cousin told me about this app called Yik Yak and it’s basically anonymous Twitter for colleges. It’s hilarious and it gives a behind the scenes look at what the college students really think and feel about their college. I highly suggest downloading it even if it's just for the laughs.

What are your favorite apps as of late? I'd love to know so I can download them! xox Chloe

Free Downloadable Binder Covers

DIY, EXTRAS, RANDOM STUFFKim & Chloe7 Comments
socialstudies.jpg

One of our all time most popular posts is our “Decorating Notebooks” post from a year ago. We thought that, since it’s still crazy popular, we should bring it back with better and bolder designs. I decided to create free downloadable binder covers for y’all and I hope you love them as much as I do. I can’t wait to use them this year for school! I’m planning on hopefully coming up with other designs, so if you aren’t head over heels with this set then be on the look out for different styles! Here’s how to create your own: 1.Click the link that says "download" and then download the "blank canvases” to your desktop 2.Upload them into Word, Pages, Photoshop, etc. 3.Use your favorite font to write your class name on the white part of the cover. (I used Antonio from Font Squirrel!) 4. Print!

free downloadable binder cover click here to download pink + blue + navy binder cover

binder cover free download click here to download pink + blue + yellow binder cover

binder cover downloadable click here to download pink + pink + pink binder cover

Really! It’s that simple. Let me know what other patterns and color combos you would like to see… polka dots? watercolor inspired stripes? pink and green? yellow and mint green?

If you do happen to use these free downloadable binder covers, we’d love to see how they look! Tag us on Instagram or Twitter (@popcosmo) and you just might be featured on a blog post!

xox Chloe

Creative Classes online

BLOG TIPS, EXTRAS, RANDOM STUFFKim & Chloe6 Comments
Creative-classes-for-bloggers.jpg

Summer's here which means: No. More. School. So why am I so excited to start learning? Because now I can learn exactly what I want! Say what? That's right... I'm ready to start taking even more classes in all things creative. You know, those skills that aren't taught in school,  I'm looking at some creative classes online in photography, calligraphy, some more blogging skills, in-depth photoshop, and... well, I could just keep going. But there are classes for just about anything. I'm interested in more photography and photoshop and my mom wants to learn about coding, and basic DSLR cameras, and maybe even knitting. I'll let her tell you more about creative classes online. Let's get crafting! Creative classes for bloggers

CreativeLive has free live classes in photo & video, art & design, music & audio, craft & maker, money & life. Yeah, so just about everything! I've watched classes on dog photography, but I think I need beginner DSLR classes first. Chloe's interested in Advanced Lightroom and thinks posing and video sound fun too! What I like is that if you miss the classes, or you want to rematch them, you can pay a fee and have them forever. Perfect for bloggers are the graphic design class and a class for redesigning your blog

Lifehacker is a website that has some amazing tips. Simply search photography and you'll get some fantastic ideas and tips. They also have some information about classes occasionally. So, it's not a class or school, but there's always something useful.

Alt on Topic - most of you have hear of Alt Summit, a creative blog conference. While you may not have attended, you can attend classes online. About 1x per month, there are online blogging classes from blogging experts and social media gurus. The classes run all day and could be a quick fix to pick up a lot of info you would get at a conference. There's a cost... but hey, there's no airfare or hotel fees!

Infinite Skills - I like how you join and can learn any area you want for the time period. There is such a diverse range of topics from graphic design, web design, video editing, training in all the Adobe suite, to learning Excel.  You join per month, and have unlimited access to every video in all categories available. I've tried a course and enjoy how the videos are broken down into very small chunks of time.

Skillshare has classes in branding, digital illustration, digital photography entrepreneurship, fashion design, and Chloe's favorite: lettering! She's taken Calligraphy, Lettering for Designers, & Drawing Techniques for Pencil Portraits. I took the Basics of Photoshop. My recommendation as to whether or not the class will be good is to look at the approval rating and the number of students who have taken it.

Craftsy is more arts oriented and looks like you would be going to arts and crafts camp online. There are a ton of classes in knitting, quilting, cake decorating and even photography, jewelry making and paper crafts. I haven't taken any here, but this looks like a fun way to learn a new craft skill. This would be perfect for me to pick up knitting, but also for any day when someone, later this summer, dares to utter the dreaded, "I'm bored." There are a zillion solutions right here for everyone in our family!!

I'm ready for a free afternoon to take new creative classes online and gain a new skill or just try something different and fun... and with all the options literally at our fingertips, anything is possible!

Let me know if I missed one of your favorite places to learn online!


Twitter Lists: How to Declutter your Twitter Stream

All, BLOG TIPS, EXTRASKim & Chloe18 Comments
blog-tipss.gif

There is a very simple solution to declutter your Twitter stream... and it's sitting right in front of you. It's called a Twitter List. Yet you may be ignoring it. We were! But we've recently started using this 1 simple trick, and Twitter Lists have made our Twitter interactions so much more meaningful, and easier to follow. I can follow my SITS friends, my BlogHer friends, my hometown friends, and even other people's public lists. Why didn't I start using this simple trick sooner?! Twitter Tips

For those of you not familiar with Twitter Lists, I'll explain why they are so critical, plus I'm going to walk you through how to create them (it looks complicated, but it's simple!) both on Twitter and on HootSuite. What's nice is your Twitter list will automatically appear on the other social media site once you create it. So I recommend going to where you are most comfortable to create a list. Personally, I prefer creating a list on Twitter and populating it on HootSuite.

Twitter:

1. Click Me

2. Click the gear on the top right and highlight Lists from the dropdown menu

3. Click Create list

4. Name your list and describe your list (optional)

5. Click public or private

6. Click save list

twitter lists to make twitter manageable

7. To add people (a) in the following list or when you search for a friend (b) click on the person icon (c) click add to list.  Then check the name of the list to which you want to add them. That's it, they are added! Alternatively, you can search for people you want to add to your list and they can be added by clicking (d) add to list.

twitter lists

how to make a twitter list 1


HootSuite:

1. Add Stream (make sure you are in Twitter!)

2. Click Lists

how to use twitter lists

3. Select your Profile name (i.e., ours is Popcosmo)

4. (a) If you created your list in Twitter, you'll see the name of the list (ours is "Popcosmo Peeps") so click "Use Existing List" and  the name of the list you created OR (b) name your list, and optionally you can describe your list

5. Click public or private

6. Click Add Stream. Now you'll have a dedicated stream for those tweeps!

how to create a twitter list in hootsuite

7. To add people:

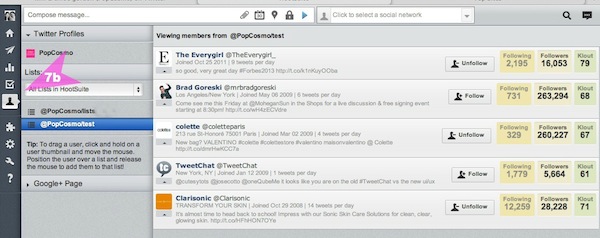
a. While you are in your stream, click the the ICON of the person (icon is to the left of the twitter name) of any twitter name in any stream. You can then simply click and drag them into your stream. You will know they are added when you see the big green plus sign in your stream. OR

b. Click the person icon in the grey box on the far right. Highlight your profile and see all those you follow. Click and drag the icon to your list and you'll know they are added when you see the big green plus sign. Hint: Click on your list to see who's in it while adding, instead of having to go to your stream.

What are Twitter Lists 3

How (and WHY) to Use Lists:

In Twitter: Click on Me and then Lists. Click on the list you want to see.

In HootSuite: You have a stream for your list!

The clutter is gone and all you should see is a stream from those people in your list. A list makes it so easy to ignore all those tweets that distract you from focusing on what you should be focusing on. {For me that means gaining hours of productivity!! No more looking at fashion photos while I should be writing or gazing longingly at your Instagrams!} With a Twitter list I can decide WHO I want to see in a stream and WHEN! All it takes a few minutes to set up a Twitter list and you've got a streamlined Tweet-erverse right at your fingertips.

Why does this matter? Once you start interacting and re-tweeting people, you'll start seeing them doing the same with you and Twitter becomes what it originally was when you only followed a few people: a conversation. It also becomes a wonderful resource for information. And it can become an invaluable asset for promoting your blog and sharing the information you have created. Twitter is give and take relationship, one which is hard to be in when there's so much "noise." Without the distraction of excess "noise" on Twitter, you can focus on those friends and people who you want to focus on, and start seeing the real benefits of Twitter.

Happy Tweeting!

Instagram Tips

All, BLOG TIPS, EXTRASKim & Chloe23 Comments
instatips-copy.jpg

Instagram has started to become my favorite social media platform. You might be asking yourselves how I like it better than Pinterest, and there is only one answer - it’s more personal. I feel like my personality can shine through more on Instagram, plus it’s kind of a game with the likes and comments :lol: . The only thing is, there are so many new editing apps that are created everyday, it’s hard to stay up to date with the cool things you can do.instagram ideas Most instagram tips will tell you how to take better pictures, how to show your personality, and how to use the filters. But no longer do the plain old Instagram filters suffice - you have to use an outside source. I’m all for it! I love me some editing. So I'm going to share my most recent Instagram find with you: I recently started using the VSCOcam app (available in the app store), and I love it. It replaces all the other complicated apps because it’s easy to use and it has some really cool features. So no complicated Instagram tips, just one big tip and how to use use my favorite tool!

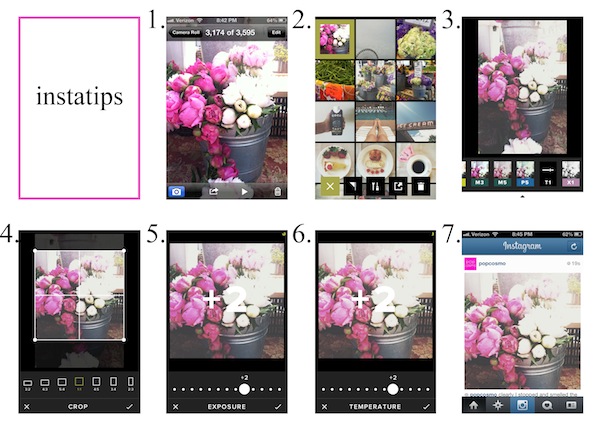
Here’s a little peek on how I typically edit a picture....

instagram tips

This whole process takes about five minutes - that's including taking the picture itself. It’s not too slow which is why I love using just one app. I’ve heard of people using up to three separate apps per picture, but for me that just takes away from the insta in Instagram.

{1} Clearly you have to choose your picture. I usually take a bunch and then pick from the best one.  I have way too many pictures on my phone, but it just feels so wrong to delete them in case "who knows what" happens. And by that, I mean my little brother.

{2} I then open up my picture in VSCOcam.

{3} I love the filters that are already in this app. I almost always use the T1 filter  because I like the white wash it gives the photo. Choosing the filter is totally up to you, and remember: your personality should shine through! I also like G3 and M5.

{4} I then crop my photo so that it’s a square so I can make sure I will like it once I post it to Instagram. If you have a taller/wider picture and want white space on the edges, I recommend the app Whitagram, another one of my favorites.

{5} I then jack up the exposure, because I like the effect it gives the photo. Clearly this is where your originality starts to shine through, and your tastebuds do the choosin’.

{6} Depending on the picture, I either slide the temperature up or down. This feature either puts more color into your picture or takes some away. See how my photo is just... softer?

{7} Lastly, upload to Instagram! Follow us and check us out to see what I've been doing lately with our photos - I'd love to hear what you think!

I hope this helps you find your own style a little bit!  And I'd love to hear more...

How do you typically edit your pictures? Are you a fan of VSCOcam?

Internet Loves

All, EXTRAS, RANDOM STUFFKim & Chloe9 Comments
updatedINTERNETLOVES.jpg

Hey y'all, it's Chloe and it's my turn to share my fave links I love this week. I spend waaaay too much time getting lost on my computer. Honestly, I don’t know where I would be without the internet; I could probably be found sitting in my room staring at the wall with nothing to do. That may or may not be an exaggeration. But lets just thank the technology gods that the internet is a thing I can enjoy... a lot. On to the links I love! link loves

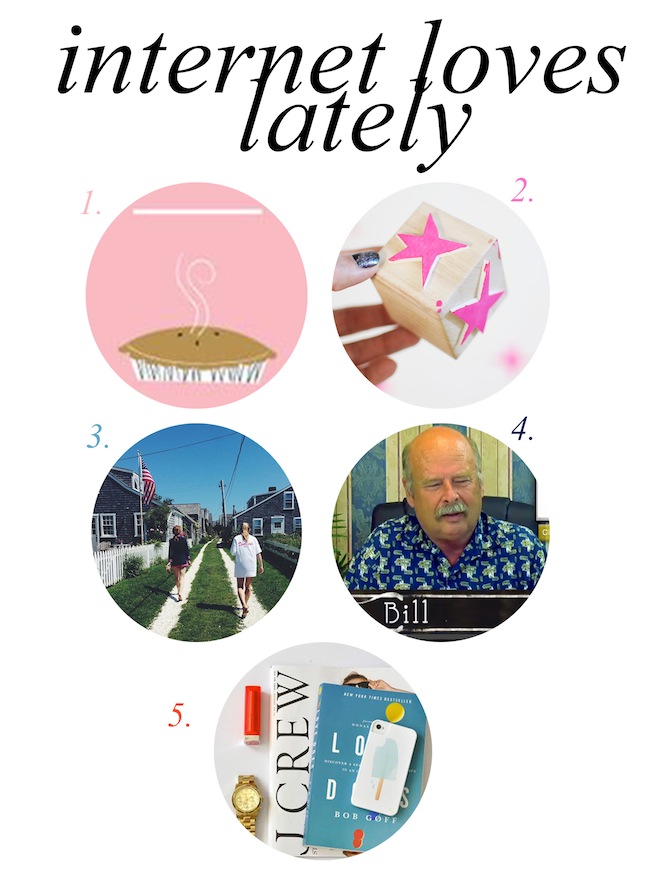
1} I am a lover of all things cute. Clearly, this Danielle Kroll print is no exception. As an aspiring graphic artist I love all of her original, simplistic, colorful prints. Anyone wanna buy me a couple to make an art wall in my room? I’m taking offers.

2} Any DIY that has “easy” in the title is my kind of DIY. I wish I was crafty, but I usually get so frustrated when things don’t look as perfectly as I know they can I just give up. *pathetic* However, I do think I could manage to make this star block. I’m also diggin’ the neon paint.

3} Some of y’all don’t know this, but I am a wannabe photographer (check out our Instagram). Amy Stone is basically who I would like to become as a photographer. I love how she can make the most simple thing into something that looks like an amazing time.

4} Clearly, I am obsessed with PopCosmo cute phone cases, and so are those of you who see me carrying them. I mean they’re just too darn cute not to include. Wink-wink!

5} Apparently “twerking” is the new trendy dance move. This YouTube video basically sums up all of my feelings towards this dance - in elder’s points of view. I have tried twerking though, and no, I can not, nor will ever be able to, twerk. My butt just doesn’t move like that.

3 simple steps to make a round picture

All, BLOG TIPS, EXTRASKim & Chloe7 Comments

Have you seen all those cute round avatars or round pictures on sidebars? It took me forever to make ours until I learned how simple it could be! So I'm sharing the simple way to make a round picture with you. The secret is... my favorite photo editing tool: PicMonkey - and if you aren't using it then I suggest you start. If you are, then you already know it rocks. (And no, they are not paying me to say this - but I'd say the same thing if they were! I just love them, plain & simple.) PicMonkey is a very simple photo editor and is quite intuitive. Chloe uses PhotoShop and loves it, but it's complicated to simple folk like me. And there are rumors of a rental fee now, so it doesn't seem like a great time for me to start learning it. chloe - 60's plain

Something I learned recently is that it is quite simple to take any online photo and and turn it into a round picture. I should have learned this a long time ago, but just wasn't experimenting enough! Not only can you make a round picture, but you can also make it look fun and funky in an instant.

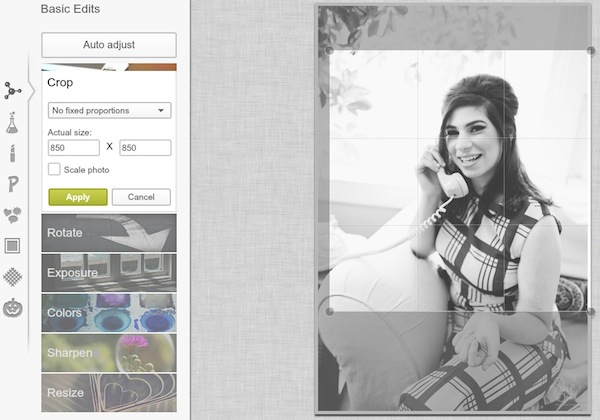
Here's how: 1. Drag a picture to the PicMonkey editor.

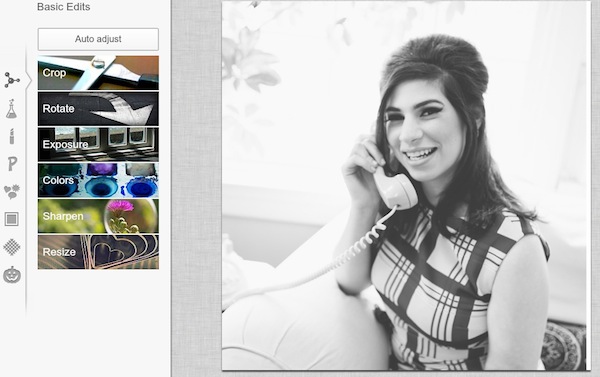
2. In Basic Edits CROP the photo to make it square by simply making the actual size of equal length and width.

PicMonkey tips

How to use PicMonkey

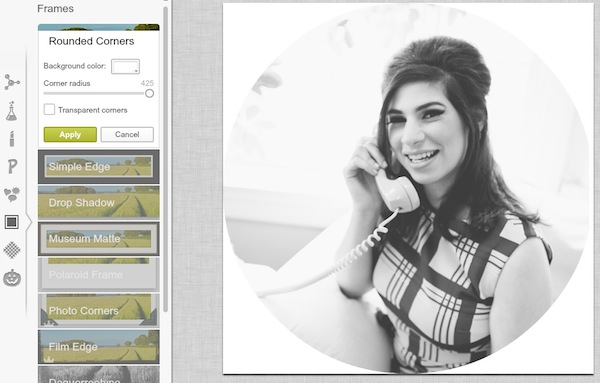
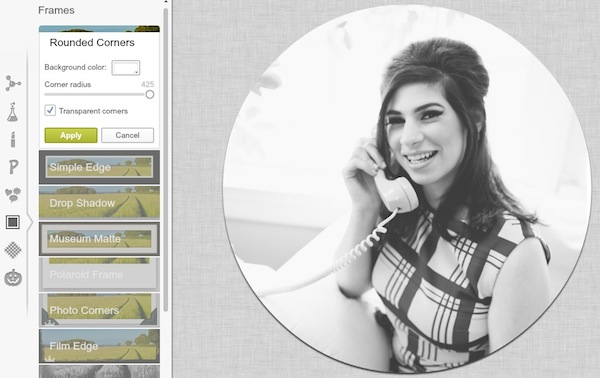
3. in Frames under Rounded Corners, round them until you have formed a circle by dragging the corner radius to 222 degrees. Click "transparent corners." And then you have your round picture!

making pictures round

PicMonkey Tips & Tricks

To get funky with your round picture... goto Effects and play!

chloe - 60'stint


Well now, that's as easy as... 1, 2, 3! So what are you waiting for? Jazz up your photos and start making them round pictures! It's not hip to be square :)

Any questions? Leave them in the comments! Or do you have another way to make round pictures -- I'd love to hear!

Blog comments: why, how, and the #1 tip you have to know now

All, BLOG TIPS, EXTRASKim & Chloe30 Comments
blogtips3.jpeg

I must confess, I've debated a while whether to write a post about blog comments. Seriously, everyone comments and everyone knows how to comment... right? {Obviously that's a rhetorical question or we wouldn't be here!} I finally decided to write this after (1) I realized that it took me a long time to learn what I've learned, and (2) I thought I knew the "1 tip you have to know now" and realized I was still making the mistake. Whoopsy-daisy!!  I thought to myself, and out loud to Chloe, "Well, if I'm making this mistake, at least I can save someone else a bit of frustration & trouble!"  Sooooo, here are our top blog comments tips!
blog comments

1. You can build a community just by commenting on other blogs.  If your comments are non-existent to sporadic, start sharing the love. Find some blogs you truly like and leave heartfelt comments. Not a simple "nice" or "cute" but a comment that adds to the post and shows you actually read it. If the blogger has time, is curious, and is interested in building relationships, they will pop over to your blog and likely leave a comment if they like your blog. I've built fantastic purely online relationships with people such as Jen of PinkWhen, Meghan of Meghan Silva, Alicia of Spashionista, and so many others simply by enjoying their blogs and leaving comments. Chloe has made great friends online through blogging. We can always count on our blog friends to check out our new posts, and we try my hardest to the same with them and so many other fab supporters of ours.

2. Don't ask people to follow you in your comments.  If people like your blog, they will follow you. If they don't, they won't. Asking them to follow is akin to following them around in real life and asking them to be your friend. Nobody would do that after kindergarten, so why do it online?

3. If you don't have something nice to say, then don't comment.  It's that simple. It's like seeing a friend in an outfit you don't like. If they don't truly want your opinion, you really don't have to give it to them. Mom's keen advice still holds true.

4. If a blogger asks a question, answer it. Unless you don't want to. I try to because it shows I read the post, but sometimes it's just a prompt for the blog reader. However, if you have something to say (see #1) then go ahead and leave your interesting and heartfelt comment!

And the #1 tip you must know:

5. Make sure your comment links back to your blog!! So simple, yet... We always visit every blog that leaves a comment on ours. Always. Well, ok, almost always. We alway try to visit, at least! Yet, I'd say that 50% of the blog comments leave links that are dead ends. Test yours. If you leave your name, but no link, it's difficult to reciprocate and visit you, and we all know what happens when something is difficult. It's not personal, but on to the next blog or comment, right?

If you are leaving a google/blogger link, make sure it links to your blog. If you are leaving a Disqus link... make sure it links to your blog. For instance, if your comment link to Twitter, then you are telling me to follow you on Twitter and not to visit your blog. That's fine, but you  might be wondering why people aren't visiting your blog after you went on a blog reading spree and left bunches of comments. Log in and check your settings and profile!! Almost every blog has a different type of commenting system - so test each system out AFTER you leave the comment! Click your link and see where it goes (you may need to log out to see.) If your comment doesn't show up right away (due to a spam filter) write the name of the blog down and visit later. Once you've checked all your comments for a week or so and they are linking back to you, you should be golden and receiving tons of comments back from all of your friends that you are visiting!

Questions people have asked me about blog comments:

Should I leave a signature (and how do I do it) with my blog name?  Sometimes we do, and sometimes we don't. If Popcosmo is highlighted when I leave a comment,and it's obvious that you can click on it to access our blog, then we typically don't leave a signature unless it's the first time we've visited that blog. If it's not highlighted, then do it! Plus, if you are not sure if the link goes directly to your blog, then do it. Once, you can confirm which commenting systems link back, you can stop leaving signatures. We don't like to be repetitive & redundant, haha.

How do I leave a signature? Obviously it's personal, but ours is: xox ~kim & chloe @ popcosmo.com  which is typed in as: xox ~kim & chloe @ <a href="http://www.popcosmo.com">popcosmo.com</a>  We used to have separate ones, but we are starting to become one person, it seems!

How exactly does commenting build a community? I should clarify that obviously 1 comment won't build a community. It takes time & you have to visit your list of blogs regularly! A great way to remember which blogs to visit is to build a list in Bloglovin' and set up a group for your commenting BFFs. Check it regularly and comment regularly and you'll see the love returned.  Let me know if you need help with Bloglovin' and I'll address that in another post!

Should I leave my email address? I never do, but if you have asked a question that you want to have answered and won't be returning to the blog to check the answer, then you should let the blogger know you'd like an email, but they might not always have time to respond! In Blogger, under Edit Profile, you have to check "Show my email address," in Disqus, I receive an email address. We have had plenty of conversations on our site when readers ask for information, especially pertaining to our DIY and Beauty posts. But, we've also responded to emails, they just take a lot longer.

I hope you found this helpful!

Do you have any questions about commenting or Bloglovin'? Let us know!
Emojis made Easy - The Quick Guide

EXTRAS, RANDOM STUFFKim & ChloeComment

We love emojis since they can express so much emotion in just 1 click. Here's a super-easy way to get emojis on your iPhone for free!  emoji install

Just follow these steps:

1. Click Settings (looks like bike gears) 2. Click General 3. Click Keyboard 4. Click International Keyboards 5. Add New Keyboard 6. Click Emoji

That's it! When texting or writing an e-mail, you can just tap the world-looking button next to the space bar and say it in Emoji!

Enjoy :)


We've flipped for Flipboard

EXTRAS, RANDOM STUFFKim & Chloe

We heart Flipboard. It turns your iPad into a magazine with pages you can flip. Put Facebook and Twitter on it, magazines, and anything else. You are making your own favorite magazine and it’s gorgeous (don’t worry, you just click “add” and Flipboard does all the hard work to make it pretty). So, now you’re an editor of the best magazine anywhere – yours! Flipboard, free, buy at iTunes App Store