It’s a summer essential: the jean short and we show you how to (1) create DIY jean shorts from long pants and (2) DIY bleached shorts. Jean shorts can be dressed up or dressed down and go with practically any item in your closet, which is why we can't get enough of them. And you know we love any easy DIY project! And Sarah has some great DIY projects for us! {UPDATE: Her 2nd article features American Flag DIY jean shorts and we have DIY tie-dye shorts too!}
image via Pinterest (no through link provided!)
#1 High-waisted Jean Shorts
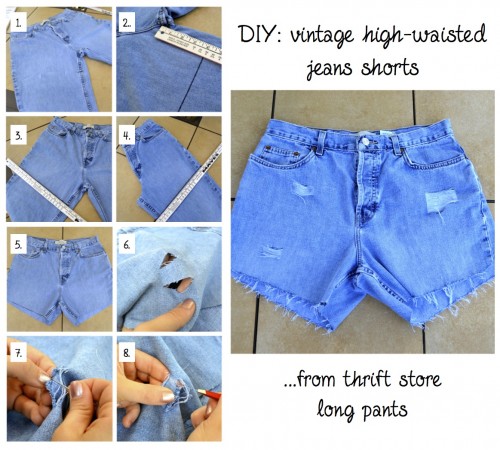
This summer, the 90’s are back with high-waist vintage style jean shorts being all the rage. The downside to this adorable style? Shelling out some serious cash to get your hands on the perfect pair! But, inspired by a pair I saw at Urban Outfitters, I decided to make my own… and show you how too. Start with a visit to your local thrift store (I went to a Goodwill) and find an old pair of “mom jeans” (they will have a longer zipper). Bonus: the jeans were only $3!
Materials needed: thrift store long pants, scissors, a pen, a ruler, a needle, and tweezers
Steps: 1. Lay out the thrift store jeans on a flat surface with the legs of the pants spread apart so inseam in visible. 2. Measure 3 inches (or your desired short length) from the inseam of the crotch (trust me, I hate that word too!) and mark with a piece of chalk or pen. You can also lay your favorite pair of shorts on top and mark the jeans to match the length of the shorts. 3. Lay the ruler across the left leg of the jean at a slight angle up. This creates a more flattering cut on the body, but make sure to not over-do the angle. 4. Draw a line from the mark of the inseam to the outside of the leg. 5. Fold the pants in half, making sure all seams are perfectly matched up. Mark lines on the right side of the leg corresponding to the ones on the left leg. 6. Unfold and draw line from seam to seam on right side of the leg. -Cut! Use your scissors to cut straight across the leg. You may have to do one side of the leg at a time depending on the strength of your scissors. Tip: If you angle your cut a bit up towards the outer part of the leg, it looks more "designer". -Repeat on other leg. -Voilà! You have now made jean shorts!
Optional fraying and tattering…. 6. Take your scissors and make two horizontal cuts any desired width apart from each other. It’s easier to start smaller on your first try. 7. Next, use your needle to get under the white threads (on the inside below the blue threads) of the jean, pulling them out to loosen the fabric. The white threads run horizontally under the blue threads. Pull about 4 threads out from the top and bottom of the piece in between the two horizontal cuts. 8. After loosening the fabric, take your tweezers and gently pull out the blue threads (that run vertically down the jean) in your space cut. This may seem tedious at first, but after pulling a few out it becomes very easy and you don’t have to tug as much. Continue until all the threads are out and only the white threads running horizontally are present. -Make as many desired frays as you want! After going through the wash they will appear more “vintage” and tattered. You can also take a razor blade if you want more subtle holes in certain spots. Make a single horizontal cut at any desired length, and put through the washing machine to tatter.
#2 DIY Bleached Jean Shorts (my personal favorite)

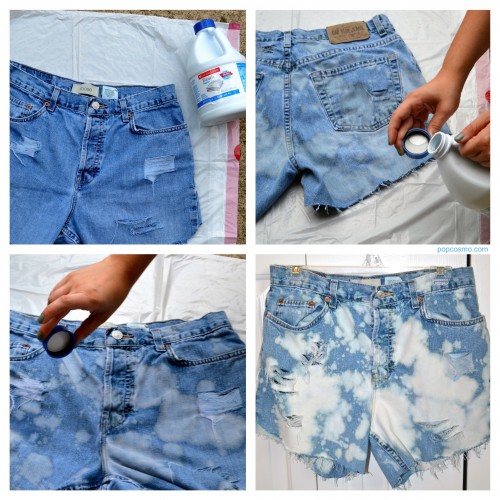
Materials needed: jean shorts, bleach, trash bag (or go outdoors), plastic gloves
1. Lay jean shorts flat either on a plastic trash bag indoors or outdoors. If you are indoors, please make sure bleach does not come into contact with other fabrics or your work surface and work in an open airy place because the smell of bleach can be toxic. 2. After putting plastic gloves on (the bleach can irritate your skin if given direct contact) open the bottle of bleach and pour a little into the cap. 3. Pour the bleach in the cap and carefully splatter the bleach in the cap across the front of the jean shorts in any desired way. Refill the cap and continue to splatter until you your desired look. 4. Turn the shorts over and repeat on backside. 5. Place the jean shorts into the dryer to set the bleach. After drying you can bleach more if you don’t have as much of an effect as you want. 6. Wash and dry the jean shorts in the sink or machine to remove remaining bleach. 7. Complete! You have now made your own pair of bleached jean shorts!
~By Sarah, Intern 2012


