
October is a busy month… there’s homework, homecoming, school projects and extracurricular activities, so free time to do baking projects may be limited. Our friend KC Bakes, who showed us how to make cake pops and marshmallow pops, is back with some quick and creative ways to get into the Halloween spirit with her amazing halloween recipes!

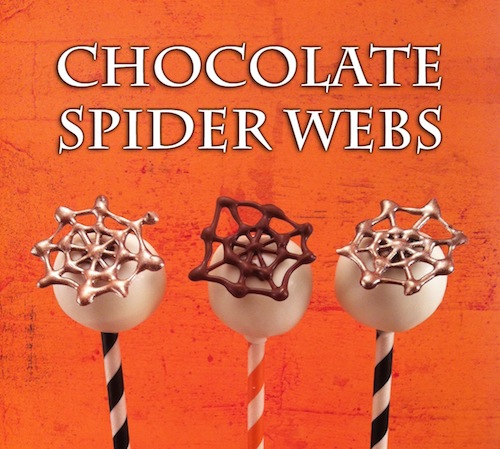
Chocolate spider webs are a fun and easy way to give any dessert the perfect touch Halloween flair.
You can free-hand them, or draw spider webs on a piece of paper as a guide, placed under waxed paper.

Fill a sandwich-size Ziploc bag with your melted chocolate to create a piping bag. For thin lines, snip a small tip off of the corner of the bag; if you want thicker web lines, snip a larger tip. Then simply trace over your lines with chocolate onto waxed paper.

I will be perfectly honest with you guys… it took me a few attempts to get the hang of things. Depending on the consistency of your chocolate, it can come out fast and runny. Practice piping some lines on a spare piece of waxed paper. The trick to an ideal looking spider web is getting the web to droop, to give it that slight “U” shape between the web lines. Great web line (see orange arrow); not so great line (see black arrow). I found that if I let the chocolate cool slightly, it was easier to pipe in a controlled manner.

Put the webs into the refrigerator for 2-3 minutes, just long enough for the chocolate to harden. You can allow them to dry on the counter at room temperature, but the fridge speeds up the setting process.
Pearl dust is a great way to add some pizzazz to chocolate items; you can find it at almost any craft store, and it comes in a variety of colors. However, I found that bronze luster dust in particular gives a great metallic look to brown chocolate.
Using a dry, clean paint brush, dip the tip of your brush into the pearl dust, and tap off the extra. You do not need to mix the dust with any liquids whatsoever.

Brush the pearl dust directly onto the spider webs. For just a shimmer, use a faint amount of pearl dust; for a bold, metallic look, brush on a heavier amount.

After you are satisfied with your webs, remove them from the waxed paper… they peel right off, so be gentle. Also, be careful not to hold your webs for too long in your hands – because they are thin, the warmth of your hands can cause them to begin to melt.

Now that your chocolate spider webs are complete, you can stick them on anything! You can dress-up cupcakes, cookies, brownies… even ice cream!

To adhere them to cake pops, simply pipe a small dot of melted chocolate onto the back of the web.

Then adhere the web onto a finished cake pop… ta da!

These spider web cake pops are extra spooktacular thanks to the accessories I got from Waiting on Martha.
Paper straws can be used for a variety of party treats… use them to make pops out of marshmallows, brownie bites, rice crispy treats and more.

Unfortunately paper straws are too big to fit into KC Bakes cake pop stands… but I have a quick fix! Fill your stand with cake pop sticks; the straws slide right over the sticks, which actually give them great support.

Now, see those jazzy stripes on my KC bakes cake pop stand? They’re Washi tape!

Washi tape comes in a variety of colors and patterns, and can be used for a zillion things… just type “washi tape crafts” into Google, people are using it for everything from decorating pumpkins to scrapbooking, and so much more.

What I like about it most, is that its thin, but durable. And the best part, it comes off easily, leaving no residue behind.

Chocolate Spider Webs & Halloween Décor Supplies
• Milk Chocolate melting candy
• Sandwich-size Ziploc bags
• Waxed paper
• Cake pop stands from KC Bakes
• Paper Straws from Waiting on Martha
• Washi Tape from Waiting on Martha
For more amazing cake pop tutorials and tips, check out KC Bakes tutorials here!