Popcosmo

a blog for everyone and their mothers

diy

Free Binder Covers

DIY, EXTRAS, RANDOM STUFFKim & Chloe20 Comments

Well, I promised that there would be new free binder covers out soon, and I’ve kept the promise by following up with more cute binder covers. I decided to keep it preppy with the color combos + stripes, because I think a lot of you will really like them… I know I love ‘em. We truly think that cute school supplies can make an entire school year more bearable, so we've got you covered when it comes to amping up the cuteness factor of those ugly and plain binders. Click the links below to download a black canvas so that you can enter your own class names in the circle! But. they work for anything -- in fact, my mom is even using them around the house for things like take-out menus  and papers for me and my brother. Hope you like this new design as much as the first set. Free binder covers for the win!

Also, if you use them be sure to post a picture on Twitter or Instagram and tag us @popcosmo and we will totes love you forever and ever. ;)

back to school and office supply binder cover templates
DIY binder covers
DIY binder covers
free downloadable binder insert | takeout menus
DIY binder covers for school and home

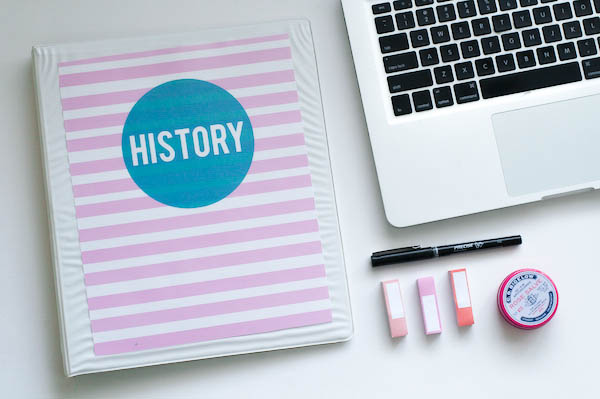
DOWNLOAD pink+teal DOWNLOAD blue+greenDOWNLOAD navy+pink

xox Chloe

DIY Graphic Tee

DIY, FASHIONKim & Chloe6 Comments
blah blah blah diy graphic tee | popcosmo

What's one item I could wear with everything? A graphic tee... every time I walk into J.Crew I want another one! But they are breaking the bank, so I turned to my trusty Cricut Explore, which had been getting dusty while we moved and I was away this summer. It's definitely time to start playing with it again since it is so versatile and makes the most complicated craft ridiculously easy! The best part? That's my handwriting. Mhmm. I officially have the coolest shirt around town - my own DIY graphic tee.

tee: Gap | necklace: Ela Design Studio | sunnies: Ray-Ban

Supplies: T-shirt Cricut Iron-on Cricut Iron Ironing board Tea Towel or t-shirt

blah
blah

Feel free to use our .png file below! Then we can be twinsies with the same shirt ;)

Directions: 1. Cut Cricut Iron-On a little larger than the words you are printing and place it shiny side down on mat. Load into the Cricut and follow directions. 2. Be sure to check the box for "Iron On" so that your words will be backward. (This will make sure that when you actually iron on it will be in the right direction) 3. Peel the extra Iron-On material off of the transfer sheet and make sure that no little "extras" are still on your design. 4. Center the design on your shirt and iron onto shirt with a tea towel in between the iron and the Iron-On material. 5. Sit back and admire... then wear what's sure to become your DIY favorite graphic tee and rake in the compliments.

cute graphic tee
cute graphic tee
DIY graphic tees
DIY graphic tees
blahblahshirt
blahblahshirt

Disclosure:  We are members of the Cricut Blogger Network and received product in exchange for review but as usual all opinions are 100% our own. 

Homemade Hibiscus Pomegranate Granola

EXTRAS, RECIPESKim & Chloe7 Comments
Onli Homemade Granola

As you might have noticed, we’ve been posting a lot of recipes lately! I don’t know if it’s just that we have a better kitchen in our new house in Denver, or if I’ve just been enjoying making my own food over going out. Whatever it is, I’m loving it. Onli Beverages was nice enough to send me a few drinks to try out and I decided to get creative with it. With my cousin Aly visiting, we made Onli flavored granola. Seriously? Yes, and this homemade granola is beyond delicious.

Ingredients:

2 1/2 cups of oats 1 cup puffed rice 1/4 cup sliced almonds (or other nuts) 6-8 ounces of Onli Hibiscus Pomegranate Aronia 1 egg white 1/2 teaspoon vanilla extract 1-1/2 teaspoons cinnamon 2 tablespoons honey (add more for sweeter granola) 1/4 teaspoon salt

Directions:

Preheat your oven to 350 degrees. Mix the oats, puffed rice, and almonds in a bowl. Mix everything else in another bowl. Then combine the two bowls into one. Stir it all until the liquid is absorbed. (You might need to add more oats or puffed rice to help) Lay all the granola on a cookie sheet covered with parchment paper. Put your granola in the oven for 15 minutes, then stir and put it back in for another 15 minutes. (If you want it to be super crunchy, then you can put it in for longer).

Homemade Granola Ingredients
Homemade Granola
Homemade Granola
Homemade Granola | PopCosmo
Granola Recipe
Granola Recipe
granola
granola
how to make granola | PopCosmo

This should make a batch for about three people so feel free to double or triple the recipe. We ate ours over yogurt and we've learned that we need to keep a constant supply on hand. Onli has a ton of flavors so we definitely want to experiment with the rest of them! If you try this recipe out be sure to tag us (@popcosmo) and @ONLIbeverages in the picture! We might be biased, but we think it's the best homemade granola you'll ever eat!

xox, Chloe