Popcosmo

RECIPES

Nutter Butter Love Bites

EXTRAS, RECIPESKim & Chloe6 Comments

Valentine’s Day is coming up, and handmade gifts are a surefire way to impress the ones you love. But who has the time? Kim from KC Bakes is back with yet another amazing creation! Although you could certainly dress up her cake pops, marshmallow pops and push pops for Valentine's Day, these Nutter Butter Love Bites are amazingly delicious, simple to make and easy on your wallet.

Valentines Day Treats

Taking less than an hour to create, they only involve 3 ingredients and can be made for less than $20! Here’s what you’ll need…

valentine's day

Nutter Butter Love Bites Yields 24 bites

Ingredients:

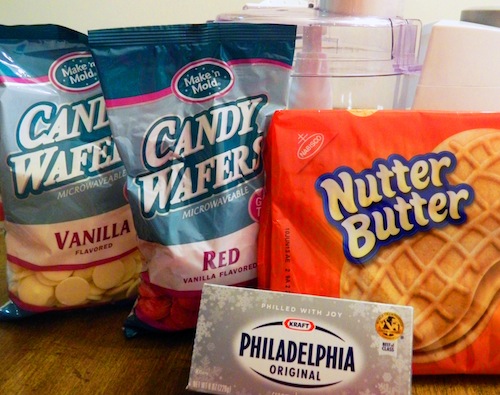
• One (1) box of Nutter Butter cookies • One (1) 8-oz package of Philadelphia cream cheese, brought to room temperature • Two colors of candy melts

Supplies Needed:

• Food processor o If you don’t have a food processor, you can use a Ziploc bag & rolling pin • Peanut butter cup mold tray (found at any craft store) • 1.5” cookie scoop (not crucial, but it’s helpful to make the same size bites)

OK! Let’s get started…

peanut butter cookie recipe

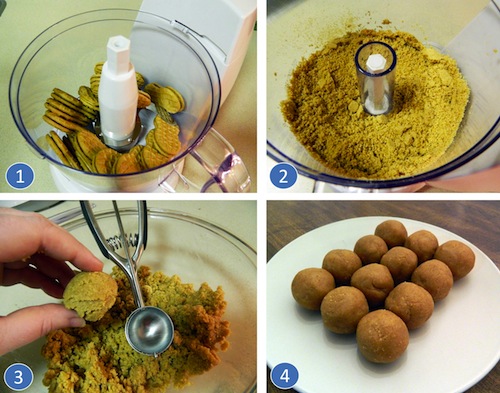
1. Place the cookies into the food processor. If you don’t have a food processor, place the cookies into a large Ziploc bag, and use a rolling pin to smash them into crumbs.

2. Grind the cookies until you get a fine crumb consistency. You don’t want any big pieces of cookie remaining, or the mixture will not absorb the cream cheese.

3.  (a) In a medium-sized bowl, mix in about a 1/2 of a block of cream cheese… you may end up adding the whole block, but it’s better to start off with a small amount, and add more as you go. I found it easier to use my hands to thoroughly combine the crumbs and cream cheese.  (b) A good test to know if you’ve added enough cream cheese… the mixture should hold its shape when squeezed in the palm of your hand, or measured out with a cookie scoop.

4. Roll the mixture into smooth, round bites. Place them into the refrigerator for about 10 minutes, while you melt your chocolate.

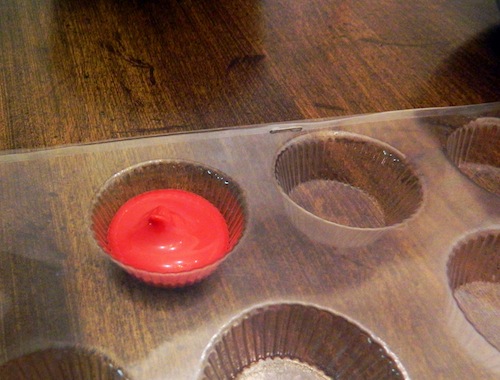
Fill the peanut butter cup mold wells about two-thirds full.

Valentine's day nutter butter treats

Place the peanut butter bites into the chocolate. If you over-fill the well, the chocolate will spill over the sides and leave an edge around the bites. If you under-fill them, you can see it will leave crevices in the mold.

Valentine's treats

Once you’ve filled all of the wells in the mold, place the tray into the refrigerator. After 5-10 minutes, the bites will easily pop out of the mold.

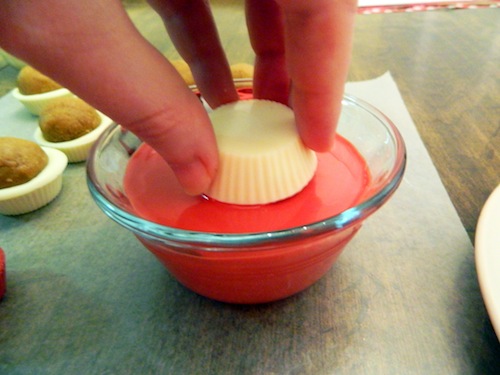
Holding the bite upside-down, dip it into your second color of melted chocolate, just up to the edge of the cup.

Valentine's Day recipes

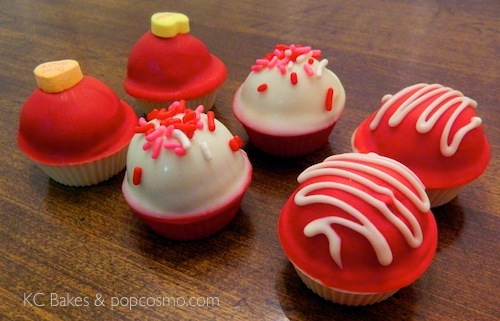
Allow some of the excess chocolate to drip off into the bowl, then place the bite on a plate to dry. Jazz up your bites by adding some conversation hearts or sprinkles to the tops before the candy hardens. You can also let the top chocolate harden, then drizzle on some of the other color chocolate.

Nutter Butter Love Bites

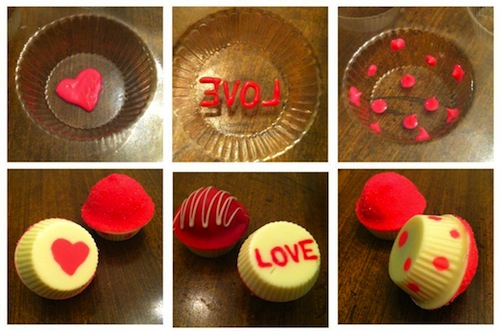
If you want to get really creative, use a toothpick to draw some decorations into the mold wells (top row, shown below). Put the tray into the refrigerator and allow these designs to harden before filling the well with the other color chocolate, then insert the peanut butter ball.

Nutter Butter Bites

Now that you have the sweetest little homemade treats, find a festive way to package them to add that final personal touch.

peanut butter treats

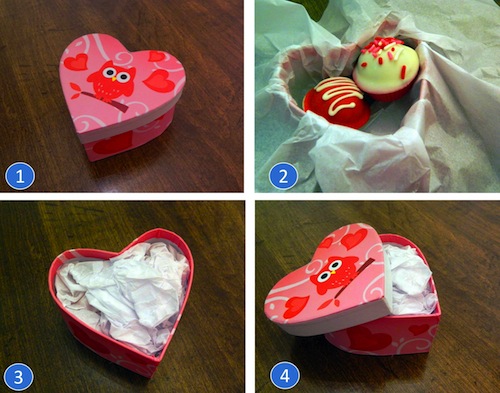
1. I found this box at Michaels for $1!

2. Line it with tissue paper to protect your treats.

3. Tuck the paper into the box so that there is nothing hanging over the edges.

4. Voila! The perfect little gift of love that any friend or significant other will be truly touched by.

I hope you’ve enjoyed this little tutorial!

~ Kim from KC Bakes

For more recipes, check here from KC Bakes, and also follow her around the web… Facebook, Instagram & more!


 

Super-easy salads, super-fast salad recipes

EXTRAS, RECIPESKim & ChloeComment

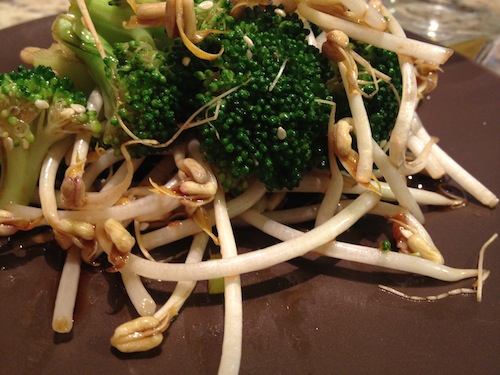
Our teen chef, Kayla, from The Nerdy Chef, has some recipes to make it so much easier to eat healthier or maintain resolutions since her salad recipes taste so good and are good for you. Asian Broccoli Salad

You may not have liked broccoli as a kid, but that's because you've never had broccoli like this. You just steam it and toss it with some other vegetables like scallions and bean sprouts as well as some dressing. If you've never made salad dressing before, don't be intimidated. All you have to do is whisk some ingredients together and you're done! Just toss it with the vegetables and you have a delicious, easy, and nutritious salad!

salad

4 Cups Broccoli Florets (About 2 Heads) 2 Cups Bean Sprouts 2 Scallions, White & Light Green Parts Sliced Thinly 1/4 Cup Cilantro Leaves, Optional 1/4 Cups Almonds, Chopped 2 T + 1 tsp Sesame Oil 1/4 Cup + 1 tsp Soy Sauce 2 tsp Rice Vinegar 1 tsp Honey 1 Clove Garlic, Minced 2 tsp Grated Ginger

1. Steam the broccoli until tender, about 4-5 minutes. Place the florets in an ice bath until cooled, then drain. 2. Heat 1 tsp sesame oil. add the almonds, stirring until toasted and fragrant. Stir in 1 tsp soy sauce. Cool. 3. Combine the remaining sesame oil, soy sauce, vinegar, honey, garlic, and ginger. 4. Toss the broccoli, bean sprouts, scallions, cilantro, and almonds together. Stir in the dressing.

Serves 4-6, Recipe Adapted from Anja's Food 4 Thought

Cucumber Salad

Looking for a simple side dish that won't break your New Year's resolutions? This is it. It's just thinly sliced crisp cucumbers tossed with a yummy dressing and sprinkled with crunchy sesame seeds. It's that easy. The only trick is to keep the slices of cucumber as thin as possible so that they absorb the dressing. I have a mandoline, a really cool little piece of equipment that can slice anything as thin as you want it to be. I like to use it for this since it really speeds things up, but make sure you are very careful if you want to use one. If you don't have one, it's just as easy to use a knife to slice the cucumbers paper-thin. Either way, it will be fantastic!


easy salad recipe

2 lbs Cucumbers 1/2 tsp Salt 1/2 Cup Rice Vinegar 2 T Soy Sauce 2 tsp Sesame Oil 2 T Sugar 1/2 tsp Sesame Seeds

1. Slice the cucumbers thinly; mandolines work well for this. Toss with the salt and let sit for 5-10 minutes. Squeeze gently to dry. 2. Combine the vinegar, soy sauce, sesame oil, and sugar. 3. Toss the cucumbers with the dressing. Let sit for at least 1 hour. 4. Sprinkle with the sesame seeds before serving.

Serves 6-8, Recipe Adapted from Appetite for China

For more delicious recipes by our Teen Chef, Kayla, check out her blog, The Nerdy Chef!

Holiday Desserts: Push Pops

EXTRAS, RECIPESKim & Chloe3 Comments

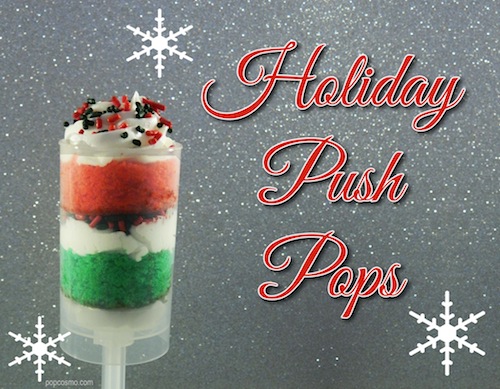
Kim from KC Bakes, our favorite cake pop princess,  is back to show you creative Push Pop ideas for Christmas and Hanukkah that you can adapt for any time of the year or for any holiday desserts. The winter holidays are a time of family, friends and food. Food is everywhere, especially holiday desserts… there are plates and pans of cakes, cookies & pie (oh my!).

If you are in charge of sweets for your holiday get-together, make sure you stand out from the crowd and bring something truly unique. Push Pops are sweeping the dessert world by storm... here's why.

holiday push pops

Push Pops go by a few different names… push pops, push up pops, push up cakes, push cakes, etc. They are basically a plastic cylinder that has a stick that will literally push the container’s contents up to the surface.

holiday push pop

One of the most popular combinations for Push Pops is cake, frosting and sprinkles. Who needs plates and utensils? Cake Push Pops are mess-free and easy to serve.

holiday push pop

Since the cylinder container is see-through, it’s a great way to use color-themed food to match the occasion you’re baking for.

For these Christmas-colored cakes, all you need is a box of cake mix, the ingredients it calls for and food coloring! White cake mix is preferable, as some vanilla cake mixes can have an off-white or yellow-ish hue.

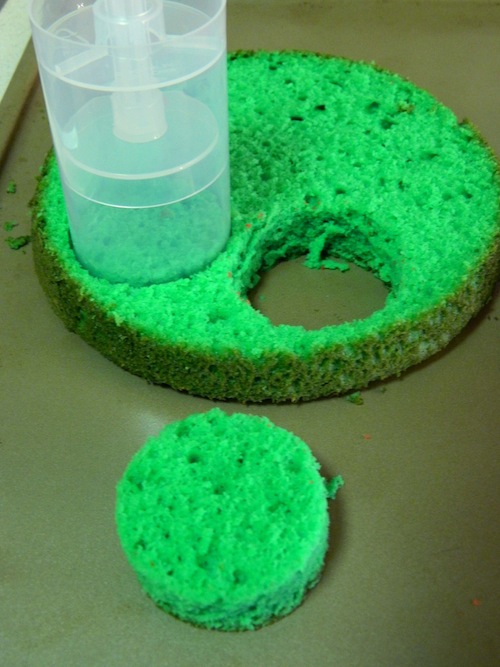
When the green cake comes out of the oven, it doesn’t look super pretty… see the top and sides? Fear not! This is just the “crust” or the sides of the cake that were exposed to the direct heat. Make an even slice across the cake and it will reveal a beautiful shade of green.

holiday push pop

To get the perfect circle shape, use the actual Push Pop container itself to cut out discs of cake.

push pop

To add some extra flavor and texture, try adding crushed candy cane pieces in between the layers!

christmas dessert

The holiday season can get expensive, and food shopping is no exception. Bags of candy cane pieces can range from $2.99 to $5.99 depending on the brand; don’t even bother with those. A box of regular candy canes is $0.99 at AC Moore, just smash them up yourself. And let’s be honest, it’s more fun to whack them with a hammer! Just make sure you have the candy canes in a thick plastic bag – the broken pieces can pierce the bag as you smash them, and then you wind up with a mess all over your counter.

Feeling festive? Party City had these cute little Santa hats for $1 – they have little clips inside of them, so after your guests eat the pop, they can wear the hat!

push pop

The great thing about Push Pops is that you can decorate the outside of the container however you like since it does not come into contact with the food product inside. Meet… Rudolph the Red-Nosed Push Pop!

reindeer push pop

It’s much easier to fill the container first, and then decorate, so let’s do that first.

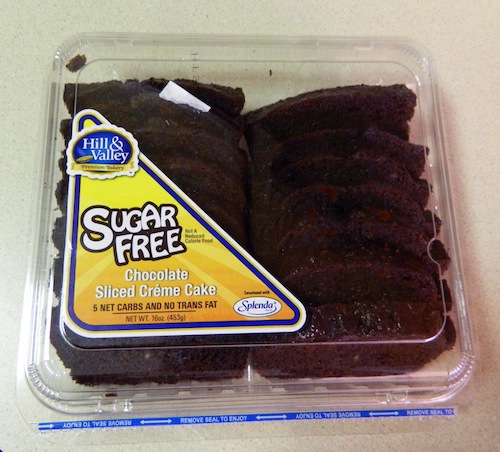
Now with all of the hustle and bustle of the holiday season, you may not have time to do a lot of baking. No problem! There are so many prepared desserts that you can convert into Push Pop fillers, and your party guests will never know.

This pre-sliced cake is perfect, it’s already cut into even strips for you!

push pop

Using your Push Pop container, cut out discs of the cake and layer it in. I used Betty Crocker Cookie Icing in between the cake layers; it’s a great product because it comes ready-to-go in a piping bag.

For Rudolph’s features, you’ll need googly eyes, red pom poms and brown pipe cleaners, or “chenille stems”. To make the antlers, you’ll need two shorter pieces, and one longer piece. Twist the shorter pieces at their middle around the longer piece and voilá – antlers!

The eyes and nose were easy to glue on, but the antlers didn’t seem to want to stay in place. Cut some thin strips of clear tape to secure them in place; if you press the tape on well enough, it’s barely noticeable.

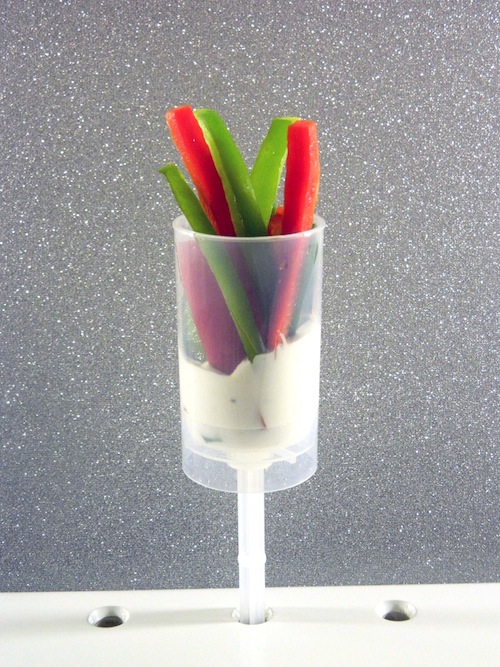
For the more health conscious guests at the party, there are a lot of Christmas-colored fruits and veggies that you can layer in your Push Pops. Slice up some red and green bell peppers for the perfect hand-held appetizer, complete with ranch dressing inside of the container!

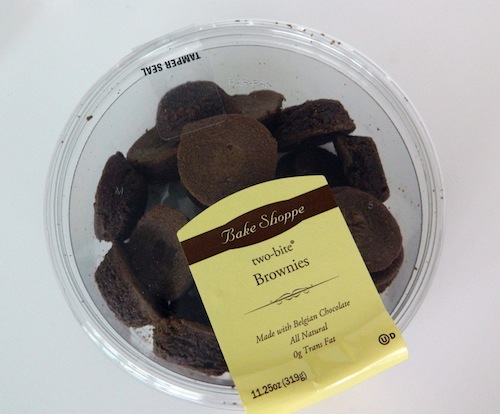
Now, since Hanukkah is already underway, I’ve got some more quick, no-bake ideas to fill your Push Pops. First up, brownie bites!

push pops

To jazz up the containers, I found these sparkly stickers at Party City as well.

hanukah push pops

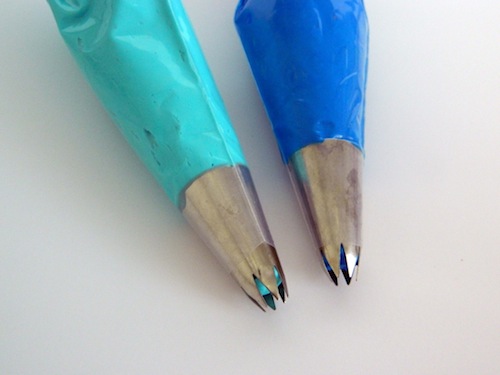
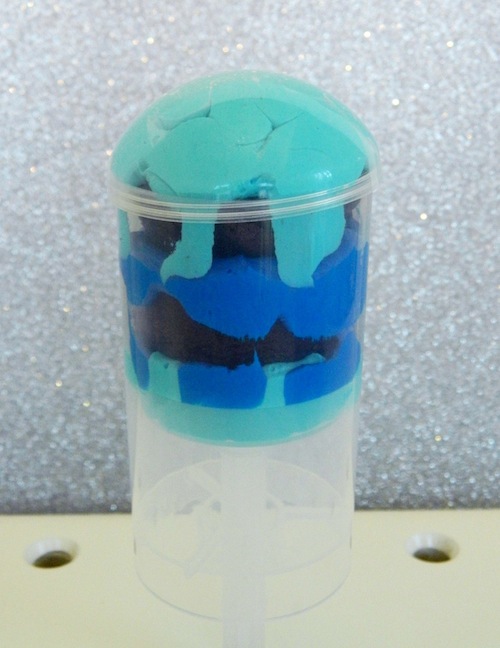
Using teal and blue Wilton icing colors, tint your frosting as bold as you like. Remember to start off with just a little bit of dye, and add more as you go – you can always add more color, but you can’t remove color if you “over-dye”.

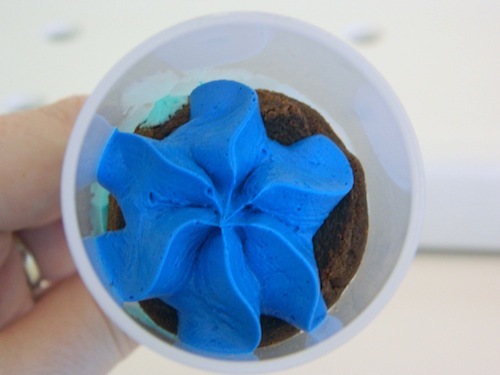
This pretty shape of icing (below) was made using a flower tip (metal icing tip, shown above).

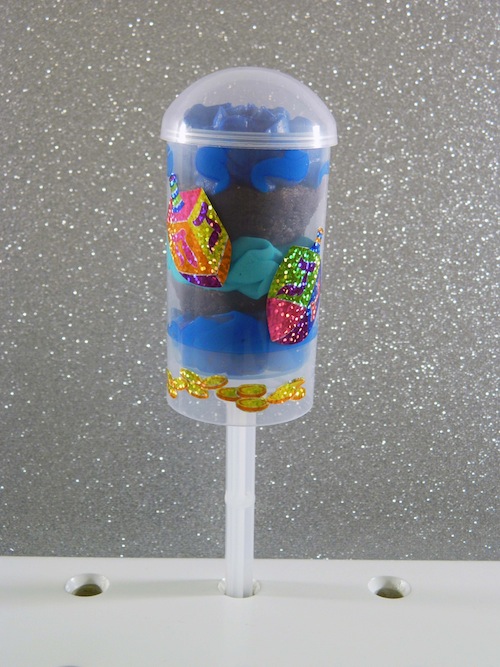
Ta da – the finished product, ready for a Hanukkah gathering!

hanukah dessert

A word of caution regarding lids – use two hands! If you place the lid on the Push Pop, and push down on it without holding the sides of the container, this may happen…

Whoops! No one is immune to baking bloopers!  :oops:

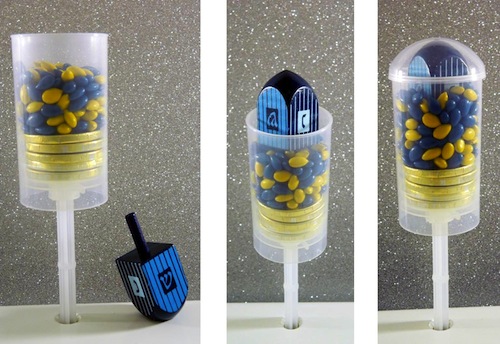
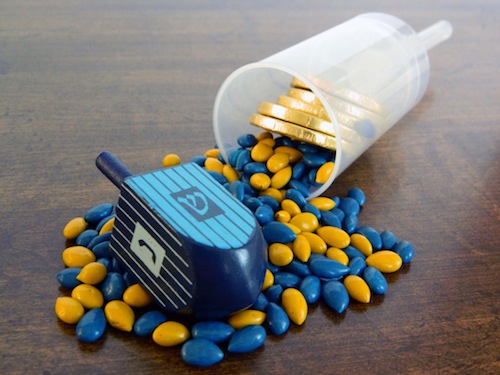
While I was at Party City, I spotted chocolate gelt and the bigger coins fit perfectly inside of the Push Pop containers! I had recently bought some chocolate-covered sunflower seeds at a farmer’s market, so I picked out the blue and yellow seeds and added those to the container as well. But it still needed something to finish it off… a dreidel!

desserts for hanukah

Since the dreidel is touching the sunflower seeds, be sure to wash it off before adding it to the mix. Just like the excitement of finding a prize at the bottom of a cereal box, the dreidel adds such a fun touch of whimsy to these Push Pops.

chanukah desserts


Holiday Push Pop Essentials

• Push Pop Containers (I bought mine from Global Sugar Art; great prices and fast shipping!)

KC Bakes Push Pop Stands

Other Push Pop Filler Ideas

• PEEPS® Characters

• Donut Holes

• Cookies

• Mini Cupcakes

• Rice Krispy Treats


Push Pop Container Décor Ideas

• Hand-decorate or personalize the containers with Sharpie Markers

• Ribbon

• Washi Tape

• Sequins

• Rhinestones or craft ‘jewels’

Enjoy and let us know in the comments below which push pop is your favorite! 


Hanukah Latkes

EXTRAS, RECIPESKim & ChloeComment
Our teen chef, Kayla, from The Nerdy Chef, is back with an easy Hannukah Latke recipe for teens and anyone who wants a quick and easy recipe!
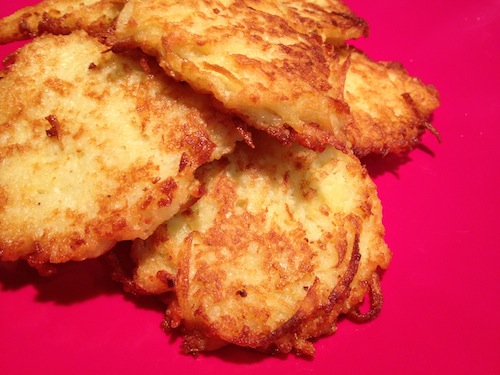
Honestly, I've already eaten my fair share of latkes. The little nuggets of potatoes are both creamy and crispy, and Hannukah is the best excuse to eat them. I've been inhaling them for a few weeks already, but it is finally socially acceptable to eat plates and plates of them. This recipe is unbelievably easy to make, so you will never use a box mix again! You simply peel and shred some potatoes, drain off the liquid, mix them with onions, eggs, and some matzo meal to bind the mixture, and fry to your heart's content. It is Hannukah, after all, so don't even bother trying to bake these. You have to fry latkes; one of the main rules of eating during Hannukah is to fry as much as possible to remember the oil that lasted for 8 days. This is one of my favorite holiday recipes, and I know that it will soon become one of yours, too.
chanukah recipe
2 lbs Russet or Yukon Gold Potatoes, Peeled
1 Medium Yellow Onion, Quartered
1 Egg
1/4 Cup Matzo Meal
1 1/2 tsp Salt
Oil, for Frying
1. Grate the potatoes. Place in a clean towel over a medium bowl and squeeze to drain the water.
2. Using a food processor, pulse half the potatoes and onions until mostly smooth. Place in a large bowl and add the remaining potatoes. Combine the egg, matzo meal, and salt. Add to the potatoes and mix until cohesive.
3. Heat some oil in a large skillet. Press the potato mixture into small patties and fry until golden and cooked through.
4. Place on a paper towel lined plate until all of the batter is cooked, then place on a platter and serve. Enjoy!
Recipe Adapted from Cook's Illustrated

For more delicious recipes by our Teen Chef, Kayla, check out her blog, The Nerdy Chef!

Easy Thanksgiving Recipes: Side Dishes

EXTRAS, RECIPESKim & ChloeComment

Our teen chef, Kayla, from The Nerdy Chef, is back with easy Thanksgiving recipes for teens to whip up, adults to create for Thanksgiving feasts, or kids to cook with moms or dads. These simple Thanksgiving side dishes are that quick and simple to prepare and jam-packed full of flavor, plus they are definite eye-candy for a turkey-extravanganza. And if you are still craving pumpkin, we definitely recommend our teen favorite Pumpkin Whoopie Pie cookies as a fave fall dessert. Garlic & Mustard Green Beans

Green bean casserole is a Thanksgiving staple, but I have a refreshing change. These green beans are packed with flavor and are so easy to make. They are much faster than other recipes, too, so you can spend more time making other delicious foods. I love the combination of sweet roasted garlic and sharp mustard, a perfect foil for tender green beans. This recipe is sure to brighten your Thanksgiving feast, but it is also easy enough to make any time of the year.

Thanksgiving recipes

1 lb Green Beans, Washed & Trimmed 6 Cloves Garlic, Sliced 2 T Olive Oil 1 1/2 T Mustard

Heat oven to 450F and line a cookie tray with foil.

Toss the beans with the garlic, olive oil, and 1/4 cup water. Spread on the prepared tray and roast for 15 minutes.

Toss the beans with the mustard immediately and season with salt and pepper.

Serves 4, Recipe Adapted from Food Network Magazine

Glazed Carrots

My family loads our Thanksgiving table with rich, luscious foods, but I always search for something to cut the wave of heaviness. These sweet and somewhat spicy glazed carrots are a fantastic way to break up my meal, and I'm sure you'll love them, too. The recipe is incredibly simple, and you can cook the carrots ahead of time and just glaze them before serving to make your day a little easier. The flavors are mellow and blend well together, but they are still unique. It is also a wonderful canvas for other flavors; feel free to throw in some orange zest or your favorite spices when you make the glaze. You can also change the amounts of chili powder or add some cayenne or hot sauce to alter the degree of spiciness. This is an excellent chance to experiment with flavors, and it will be delicious no matter what!

Thanksgiving Recipes

1 lb Carrots, Washed, Peeled & Cut into Coins 2 T Butter 2 T Honey 1 T Lemon Juice Pinch Chili Powder Pinch Cinnamon

Bring some water to a boil in a medium pot. Add the carrots and boil for 8 minutes or until almost tender. Drain.

Melt the butter in the pot. Whisk in the honey, lemon juice, chili powder, and cinnamon. Season with salt and pepper, then fold in the carrots. Cook until syrupy and tender, about 8 minutes.

Serves 4, Recipe Adapted from Sunny Anderson

Maple Pecan Sweet Potatoes

Admit it; you love those sweet potato dishes that are so full of marshmallows you can barely taste the potatoes. They are tasty, but sometimes you want some sweet potatoes that taste sweet but also taste like sweet potatoes. This is that dish.

The sweet potatoes alone have a wonderful contrast of textures. I cut them into two-bite pieces that get crispy on the outside but soft and creamy on the inside. Those are then tossed with crunchy bits of pecans and a sticky, buttery maple syrup glaze. It tastes like fall but is also reminiscent of those marshmallowy casseroles that everyone is addicted to.

Thanksgiving Side Dishes

1/3 Cup Chopped Pecans 1 1/2 lbs Sweet Potatoes 2 T Oil 2 T Butter 1 1/2 T Maple Syrup Pinch Chili Powder

Peel and dice the sweet potatoes.

Heat oven to 350F.

Spread the nuts on a cookie tray and toast until golden and fragrant, about 5 minutes. Cool.

Heat oven to 400F.

Toss the potatoes in the oil and season with salt and pepper. Spread on a cookie tray and roast until tender and golden, about 15 minutes, tossing occasionally.

Melt the butter in a small pot. whisk in the maple syrup and chili powder and simmer for 1 minute. Stir in the pecans and drizzle over the potatoes.

Serves 4, Recipe Adapted from Aida Mollencamp

Roasted Mushrooms

In Thanksgiving dinners, mushrooms tend to assist other dishes instead of being the star; this recipe will change all of that. You will want to have these instead of your turkey, your stuffing, even your pie. They are just that good. There is a bit of an Italian flair with the balsamic and the garlic; however, the flavors are still relatively mild, allowing the dish to fit with the rest of your meal and letting the true earthiness of the mushrooms stand out. You can use any type of mushrooms you want, even mixing a few varieties together, but I like to use plain old white or cremini mushrooms. They cook just right: tender throughout and not burnt on the outside. I know you'll love this recipe because it is so easy and so delicious.

Thanksgiving Vegetables

1 lb Mushrooms, Cleaned & Trimmed 5 Cloves Garlic, Minced 1/4 Cup Olive Oil 2 T Balsamic Vinegar 2 T Butter, Cubed

Combine the garlic, oil, and vinegar. Season with salt and pepper. Toss the mushrooms in the marinade and let sit for 1 1/2 hours, stirring occasionally.

Heat oven to 425F and line a cookie tray with foil.

Spread the mushroom son the prepared tray and sprinkle with the butter. Roast for 10 minutes or until tender and browned.

Serves 4, Recipe Adapted from Cheryl Bevergae Barnes

For more delicious recipes by our Teen Chef, Kayla, check out her blog, The Nerdy Chef!


Pumpkin Recipes: "whoopie pie" pumpkin cookies

EXTRAS, RECIPESKim & ChloeComment
pumpkin-cookies2.jpg

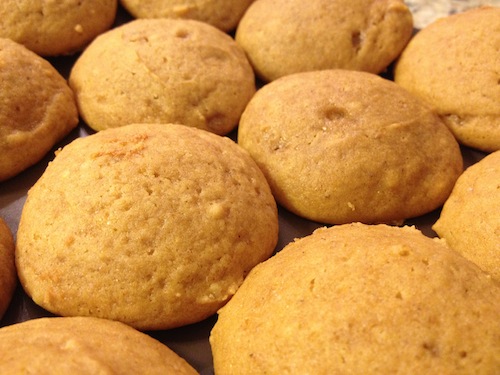
Happy Halloween! We had to bring you one more pumpkin recipe... because there are going to be a whole lot of pumpkins around for a few more weeks and you just might get tired of all that candy. Just in case.... Recipe from Kayla, PopCosmo’s Teen Chef:  If you've ever had a pumpkin whoopie pie, prepare to celebrate because these are just like the cookies in a whoopie pie. They are soft and moist, more like heavenly bite-sized droplets of cake than cookies. I make them exceptionally small to get the texture just right, but be careful or you'll end up inhaling half a dozen of them. Don't feel bad, though; they really aren't that bad for you. At least when you compare them to all the other (inferior) cookies you've had in the past. Because of the incredible amount of pumpkin, these cookies are chock-full of those things called vitamins. Oh yes, I said it. The mortal enemy of dessert, something actually healthy, is in something this delicious. How could that be? Well, you'll just have to make this recipe and find out.


pumpkin cookie recipe

2 T Sugar 1 1/3 Cups Brown Sugar 1 Stick Butter, Softened 1 Egg 2 tsp Vanilla 1 Cup Pumpkin Puree 2 Cups Flour 1 tsp Baking Powder 1/4 tsp Baking Soda 1/8 tsp Salt 1 tsp Cinnamon 1/4 tsp Ginger 1/4 tsp Nutmeg 1/8 tsp Allspice 1/8 tsp Cloves

Preheat oven to 350F. Line cookie trays with parchment.

Combine the cinnamon, ginger, nutmeg, allspice, and cloves.

Cream the sugar, brown sugar, and butter together until fluffy. Add the egg, vanilla, and pumpkin puree. Fold in the flour, baking powder, baking soda, salt, and 1 1/2 tsp of the spice mixture.

Using a small cookie scoop, roll the dough into balls. Place on the prepared trays and bake for 12-14 minutes or until golden.

Makes 30, Recipe Adapted from Marcy Goldman

For more delicious recipes by our Teen Chef, Kayla, check out her blog, The Nerdy Chef! 

Halloween Recipes: Chocolate Spider Webs & cute ideas

EXTRAS, RECIPESKim & Chloe1 Comment

October is a busy month… there’s homework, homecoming, school projects and extracurricular activities, so free time to do baking projects may be limited. Our friend KC Bakes, who showed us how to make cake pops and marshmallow pops, is back with some quick and creative ways to get into the Halloween spirit with her amazing halloween recipes!

homemade halloween treats

Chocolate spider webs are a fun and easy way to give any dessert the perfect touch Halloween flair.

You can free-hand them, or draw spider webs on a piece of paper as a guide, placed under waxed paper.

halloween ideas

Fill a sandwich-size Ziploc bag with your melted chocolate to create a piping bag. For thin lines, snip a small tip off of the corner of the bag; if you want thicker web lines, snip a larger tip. Then simply trace over your lines with chocolate onto waxed paper.

halloween ideas

I will be perfectly honest with you guys… it took me a few attempts to get the hang of things. Depending on the consistency of your chocolate, it can come out fast and runny. Practice piping some lines on a spare piece of waxed paper. The trick to an ideal looking spider web is getting the web to droop, to give it that slight “U” shape between the web lines. Great web line (see orange arrow); not so great line (see black arrow). I found that if I let the chocolate cool slightly, it was easier to pipe in a controlled manner.

cute ideas for halloween

Put the webs into the refrigerator for 2-3 minutes, just long enough for the chocolate to harden. You can allow them to dry on the counter at room temperature, but the fridge speeds up the setting process.

Pearl dust is a great way to add some pizzazz to chocolate items; you can find it at almost any craft store, and it comes in a variety of colors. However, I found that bronze luster dust in particular gives a great metallic look to brown chocolate.

Using a dry, clean paint brush, dip the tip of your brush into the pearl dust, and tap off the extra. You do not need to mix the dust with any liquids whatsoever.

ideas for halloween parties

Brush the pearl dust directly onto the spider webs. For just a shimmer, use a faint amount of pearl dust; for a bold, metallic look, brush on a heavier amount.

halloween cake pop

After you are satisfied with your webs, remove them from the waxed paper… they peel right off, so be gentle. Also, be careful not to hold your webs for too long in your hands – because they are thin, the warmth of your hands can cause them to begin to melt.

halloween ideas

Now that your chocolate spider webs are complete, you can stick them on anything! You can dress-up cupcakes, cookies, brownies… even ice cream!

halloween spiderwebs

To adhere them to cake pops, simply pipe a small dot of melted chocolate onto the back of the web.

ideas for holidays

Then adhere the web onto a finished cake pop… ta da!

halloween desserts

These spider web cake pops are extra spooktacular thanks to the accessories I got from Waiting on Martha.

Paper straws can be used for a variety of party treats… use them to make pops out of marshmallows, brownie bites, rice crispy treats and more.

halloween baking

Unfortunately paper straws are too big to fit into KC Bakes cake pop stands… but I have a quick fix! Fill your stand with cake pop sticks; the straws slide right over the sticks, which actually give them great support.

halloween cake pops

Now, see those jazzy stripes on my KC bakes cake pop stand? They’re Washi tape!

black and orange

Washi tape comes in a variety of colors and patterns, and can be used for a zillion things… just type “washi tape crafts” into Google, people are using it for everything from decorating pumpkins to scrapbooking, and so much more.

kc bakes stand

What I like about it most, is that its thin, but durable. And the best part, it comes off easily, leaving no residue behind.

cake pops stand

Chocolate Spider Webs & Halloween Décor Supplies

• Milk Chocolate melting candy

• Sandwich-size Ziploc bags

• Waxed paper

• Cake pop stands from KC Bakes

• Paper Straws from Waiting on Martha

• Washi Tape from Waiting on Martha

For more amazing cake pop tutorials and tips, check out KC Bakes tutorials here!

Pumpkin Cinnamon Bun Recipe

EXTRAS, RECIPESKim & Chloe4 Comments
pumpkin-cinnamon-bun.jpg

Recipe from Kayla, PopCosmo’s Teen Chef: Everyone loves a good cinnamon bun. The combination of warm, soft bread and sweet, sticky cinnamon filling is perfect on a cool Fall day, and it is made even better by mixing in some pumpkin. First, however, we need to distinguish between sticky buns and cinnamon buns. Sticky buns are cinnamon buns baked in a pool of caramel and then drizzled with even more of it after they are baked. Cinnamon buns are served plain or with that delicious sugary icing. My pumpkin cinnamon bun recipe has elements of both; I don't bake them in caramel, but I do douse them with a few spoonfuls of mock caramel sauce. cinnamon bun recipe

The caramel sauce for these treats is not real caramel. Real caramel is tricky and dangerous; to make it, you boil sugar and water until amber and then whisk in cream and sometimes some other minor ingredients. It burns easily and you can get burned easily as well. Overall, it's not much fun to make but is definitely worth it, so I decided to make a topping that tastes just like it but is much faster and less painful. Instead of boiling the sugar and then adding cream, I combine brown sugar, cream, and butter and boil them all together. The brown sugar gives it color and a complex flavor from the molasses and the butter adds a nice richness. The cream, of course, makes it creamy and velvety. Best of all, you don't have to watch it constantly and add ingredients at just the right moment since you just let the mixture boil until it thickens.

My favorite part of cinnamon buns and sticky buns is the bread. Yes, it is bread; it has yeast and lots of flour and is kneaded. That, to me at least, is bread. Don't be intimidated, though, because this bread is exceptionally easy to make. It only proofs (rises) twice, and both times are relatively short. This is proof (no pun intended!) that not all breads require hours slaving away in the kitchen.

And finally, we have that signature swirl. Yes, the streusel. The main reason most people eat cinnamon buns and sticky buns. That spiral of yumminess and cinnamon and sugar and all that is good in this world. So simple, yet so good. The streusel perfumes the whole bun with cinnamon and gives it an extra punch of flavor. Honestly, I can't see pumpkin without cinnamon. The two just go together so well, so I actually doubled the amount of streusel the original recipe called for (don't judge me for that until you try it).

2 1/4 tsp Yeast 4-5 Cups Flour 3/4 Cup Pumpkin Puree 1/3 Cup Milk 4 T Butter, Melted 6 T Butter, Chilled 2 T Butter 1 1/4 Cups Dark Brown Sugar 1 1/4 tsp Salt 1/4 tsp Nutmeg 5 tsp Cinnamon 1/2 Cup Cream

Combine the yeast, 1 tsp sugar, and 1/4 cup warm water in the bowl of a stand mixer. Let stand for five minutes. Add 3 cups flour, pumpkin, milk, melted butter, 2 tsp sugar, salt, and nutmeg. Knead until smooth and elastic, adding more flour as necessary, leaving 1/2 cup.

Grease a large bowl and add the dough, turning to coat. Cover with plastic and let rise for 45 minutes or until doubled.

Meanwhile, combine the remaining sugar, 3/4 cup brown sugar, cinnamon, flour, and chilled butter.

Roll the dough out to an 11x15" slab. Spread on the streusel and press lightly to adhere. Roll up so that it is a 15" log and cut into 12 slices.

Place the slices in greased muffin tins, cover, and let rise for 25 minutes. It can be chilled overnight at this point.

Heat the oven to 375F. Bake for 20 minutes or until cooked through.

Bring the remaining brown sugar, cream, and butter to a boil in a small pot, whisking until sugar dissolves. Boil, stirring occasionally, until thickened, about 8 minutes. Cool and drizzle on the buns.

Makes 12, Recipe Adapted from Back to the Cutting Board

For more delicious recipes by our Teen Chef, Kayla, check out her blog, The Nerdy Chef!


Granola

RECIPESKim & Chloe2 Comments

Recipe from Kayla, PopCosmo’s Teen Chef: Granola is the perfect snack because it is sweet, salty, and crunchy, making it both delicious and healthy. It is great on its own, but you can mix it into cereal, layer it with yogurt to make a parfait, sprinkle it on ice cream, or even make it without nuts, fruit and chocolate to use in fruit pie or yogurt pie.  This recipe is extremely easy to personalize; you can use any nut, dried fruit, and type of chocolate to fit your taste, and you can add spices and citrus zest to make the flavors more complex. I have included the basic ratio of ingredients in addition to one of my favorite variations, so get creative! homemade granola
1/3 Cup Maple Syrup 1/3 Cup Light Brown Sugar 4 tsp Vanilla 1/2 tsp Salt 1/2 Cup Oil 5 Cups Rolled Oats (don't use instant; you'll end up with oatmeal) 1 1/2 Cups Chopped Nuts 1 1/2 Cups Chopped Dried Fruit 1 Cup Chocolate Chips

VARIATION: Pecan, Orange, & Cranberry Granola

1/3 Cup Maple Syrup 1/3 Cup Light Brown Sugar 4 tsp Vanilla 1/2 tsp Salt 1/2 Cup Oil 5 Cups Rolled Oats 1 1/2 Cups Chopped Pecans 1 1/2 Cups Chopped Dried Cranberries 1 Cup White Chocolate Chips 2 T Orange Zest 1 tsp Cinnamon

Heat oven to 325F and adjust rack to upper-middle position. Line cookie trays with parchment.

Combine the maple syrup, brown sugar, vanilla, salt, cinnamon (if using), and orange zest (if using). Whisk in the oil, then stir in the oats and nuts.

Transfer the mixture to the prepared tray and spread into a thin, even layer. Press until compact, then bake for 40 minutes or until lightly browned. Cool to room temperature.

Break the granola into chunks and stir in the dried fruit and chocolate.

Recipe Adapted from Cook's Illustrated

For more delicious recipes by our Teen Chef, Kayla, check out her blog, The Nerdy Chef!


Breakfast Recipes when you are on the go!

EXTRAS, RECIPESKim & ChloeComment
Strawberry-Ricotta-Scones-1.jpg

Recipes from Kayla, PopCosmo’s Teen Chef who blogs at The Nerdy Chef. As you are heading back to school, getting up early may be an adjustment. Breakfast recipes that are quick and nutritious are important, and since breakfast is one of the most important meals of the day, you may also need a breakfast that is portable if you are rushing out the door. Kayla has two amazing recipes for us this month to help you get your breakfast AND make it to school on time! Strawberry Ricotta Scones Celebrate the end of strawberry season and the beginning of the school year with this delicious breakfast treat! These scones are not too sweet, but they are bursting with summery strawberries, hints of tart lemon, and tangy ricotta cheese. It appears to be an odd combination, but it definitely works! I recommend keeping a bowl of dough in the refrigerator and baking one or two each morning so that they are warm and fresh when you are ready to eat. They are also perfect for after-school snacks!

This recipe is fairly easy; you combine the dry ingredients and the wet ingredients separately, then whisk the two together before folding in the berries. However, there are a few tricks to make these some of the best scones you will ever have! I rub the lemon zest and sugar together so that you taste lemon in every bite. It works because the oils in the lemon zest perfume the sugar, giving it a subtle lemony flavor and pale yellow color. Another tip is to keep everything cold, including the butter, ricotta, berries, buttermilk, and the finished dough. The cold ingredients, especially the butter, steam in the oven to create a light, fluffy scone. My final piece of advice is to not overwork the dough. You want to have small nuggets of butter and ricotta, so don't worry about having a smooth, even dough.

I often find myself rushing out the door to get to school on time, so breakfast is usually overlooked. However, if I have a bowl of strawberry ricotta scone dough ready to bake, I never go hungry!

breakfast recipes

1 Egg 1/2 Cup Buttermilk 2 T Lemon Zest 2 T Lemon Juice 1 tsp Vanilla 1/2 Cup Ricotta 3 T Sugar 2 1/2 Cups Flour 2 1/4 tsp Baking Powder 1/4 tsp Baking Soda 1/4 tsp Salt 1 Stick Butter, Chilled & Cubed 1 1/4 Cups Chopped Fresh Strawberries

Heat oven to 375F. Line a cookie tray with parchment.

Combine the egg, buttermilk, lemon juice, and vanilla. Whisk in the ricotta.

Combine the sugar and lemon zest. Whisk in the flour, baking powder, baking soda, and salt. Stir in the butter, then stir in the liquid mixture. Fold in the strawberries.

Scoop the dough onto the prepared trays using a large cookie scoop. Bake for 15 minutes or until cooked through.

Makes 12, Recipe Adapted from www.twopeasandtheirpod.com

Lemon Poppyseed Muffins These muffins are one of my favorite on the go breakfasts because they are tart, tangy, and freeze well. I like to make a big batch and freeze them so that I can grab one when I need to eat quickly.

This recipe is very easy, but it is bursting with tart lemons and nutty poppy seeds. To make the flavors pop even more, I drizzle the muffins with a gooey lemon glaze and more crunchy poppy seeds. If you freeze the muffins, I would top them with the glaze and poppy seeds just before eating them instead of before freezing. It will make the muffins taste fresher, and the glaze will have a better texture.

Since these are lemon poppyseed muffins, you would expect a lot of poppy seeds. A tablespoon doesn't sound like much, but wait until you mix the poppy seeds in before increasing the amount. Remember, you want to have a lemon muffin studded with poppy seeds, not a mass of poppy seeds barely held together by some muffin batter. This applies to most recipes; personally, I stick with the original recipe the first time and adapt it to fit my taste once I make it again.

If I'm running late in the morning, I can only have breakfast if it's quick and easy, so I make sure I have a batch of these in my freezer. They are the perfect treat to wake up to!

breakfast recipes

2/3 Cup Sugar 1 Lemon 2 1/2 T Lemon Juice 2 Cups Flour 2 tsp Baking Powder 1/4 tsp Baking Soda 1/4 tsp Salt 3/4 Cup Sour Cream 1 tsp Vanilla 1 Stick Butter, Melted 1 T + 1 tsp Poppy Seeds 1 Cup Powdered Sugar Heat oven to 400F and line muffin tins with paper cups.

Rub the sugar and the zest of the lemon together. Whisk in the flour, baking powder, baking soda, and salt.

Whisk the sour cream, eggs, vanilla, juice from the lemon, and butter together in another bowl. Pour into the flour mixture and stir to combine. Fold in 1T poppy seeds.

Divide the batter between the cups and bake for 16-18 minutes or until cooked through.

Meanwhile, combine 1 1/2 T lemon juice and the powdered sugar. Gradually add the remaining lemon juice until it forms a thin glaze. Drizzle on the cooled muffins and sprinkle with remaining poppy seeds.

Makes 12, Recipe Adapted from Dorie Greenspan

For more delicious recipes by our Teen Chef, Kayla, check out her blog, The Nerdy Chef!

Marshmallow Madness: marshmallow pops!

EXTRAS, RECIPESKim & Chloe31 Comments

"It’s no secret that neon colors are all the rage right now. Everywhere I go, there they are… in clothes, jewelry, accessories… even manicures! I thought it would be fun to incorporate those crazy colors into some yummy treats, but who wants to fire up an oven in this summer heat?" So said our friend Kim, of KC Bakes, who joins us again to follow-up from her amazing cake pop tutorial with a brand new idea that is easier than easy and so darned cute and clever! We are honored to have her share her tips and awesome photos with us for Marshmallow Madness Pops ideas. Kim, founder of KC Bakes, also has a variety of tutorials on her website to teach you other ideas & techniques, so be sure to check them out! Thanks, Kim!

Marshmallow pops are so a chance to be creative and one of the easiest treats to assemble, and there is zero baking involved. If you can work a microwave, then prepare to knock the neon socks off of your friends!

marshmallow madness

Most candy companies haven’t caught up with the trend just yet, so for the boldest neon, dye white candy melts with electric shades of the rainbow. Refer to the end of this post for candy-dying tips and how to achieve neon colors.

Two-Tone Effect. Hold the marshmallow by the top edge, and dip it halfway into the first color. Using your free hand, insert a lollipop stick into the just-dipped side of the marshmallow, and put it in your KC Bakes stand (or Styrofoam) to dry. Once the first color chocolate is dry, dip the marshmallow in the second color, right up to the edge of the first color.

marshmallow pops

Sprinkle on some Cheer. After coating the marshmallow completely in a neon color, dip the top of it in some rainbow sprinkles to make those colors pop even more.

how to make marshmallow pops

Happy Birthday! Put the secondary neon chocolate into a Ziploc bag, snip the tip, and pipe it on like you’re decorating a cake. Trim neon candles in half, and before the top color chocolate hardens, insert the candle, allow everything to dry. Remove the candle before eating, of course.

marshmallow recipes

So Sweet. On a last-minute run to Party City, I came across these candy-coated sunflower seeds, and for some reason, they just spoke to me. They’re simple, cute and somehow sophisticated. And you know, these may be my favorite pop in this whole post.

marshmallow recipes

Having a neon party, but don’t have time to order candy dye? No problem! There are a lot of bright candies that will take your marshmallow pops from drab to fab!

Nerds come in huge multi-colored boxes, or you can buy them by specific flavor and color.

marshmallow recipes

Candy buttons are great because you can stick them onto the pop in any pattern you like… it’s like a candy Lite-Brite! Do they still make those?

marshmallow recipes


Pop Rocks have the trifecta… sight, taste and texture! Word to the wise, don’t make these too far in advance. If left out for too long (more than 36 hours), the pop rocks begin to dissolve and instead of having that spiky glacier-like texture, it looks like a thick gel. Learn something new everyday!

how to make marshmallow pops

Pixy Stix aren’t the brightest color candy out there, but they add a great punch of tart flavor, and they are so easy to use… just tear off the paper-end, and pour. To enhance the color, dip the top of the marshmallow in colored chocolate first; the pop on the right was dipped in pink first, and then sprinkled with a red Pixy Stick.

marshmallow pops

When it comes to taste, Fruity Pebbles were my #1 favorite. They gave the marshmallow pop some great crunchy texture, but the fruity flavor definitely brought it home.

marshmallow recipe

Now while I was at Party City, I spotted a big box of Ring Pops, and I immediately knew what I could do with them… marshmallow rings!


Marshmallow pops

To get just the plastic ring part, put an unwrapped Ring Pop into a paper or thick plastic bag. Holding the ring part to keep it steady, take a hammer and bang on the candy part a few times. After two or three whacks, the candy split clean off.

ring pop recipe

Put a little chocolate on the flat-side of the ring pop, and push it into the top of the marshmallow. ‘Mallows can be a little springy, so you may need to hold it there for a few moments until it adheres onto the ring.

marshmallow recipe

If you want to get fancyyy, dip the marshmallow in white candy, coat it with clear sanding sugar, and violá – marshmallow bling!

marshmallow ring pop

For your next get-together, neon or otherwise, remember that marshmallow pops make the perfect blank canvas to match your party theme… dip them in melted candy and go crazy (with toppings)!

Marshmallow Madness Supplies

- Kraft Jet-Puffed Jumbo Marshmallows - White Candy Melts or Vanilla Candy Coating - Assorted Candy Toppings - Neon Candy Dye - Lollipop sticks - KC Bakes Stand (or Styrofoam) - Ziploc sandwich bags

Tips: 1. Dip the tip of each lollipop stick into melted candy, then insert them into the marshmallows. Let them firm up for a few minutes before dipping the pops; this will give the pops a little bit of extra support. 2. Consider your toppings and your timeframe carefully. Marshmallow pops that are fully coated in candy can sit out for quite a few days with no problem. However, certain toppings will go stale (like cereal) or can get gooey (like Pop Rocks) if they are exposed to the air for too long. 3. For the green and yellow neon dye in this post, I used AmeriColor “Electric” Soft Gels. Unfortunately, these dyes have water in the ingredients, any type of water will make chocolate seize into a hard lump. To get around this, AmeriColor makes a product called Flo Coat, which you add to the chocolate prior to adding the dye. 4. For the pink neon dye in this post, I used Make’n Mold pink candy dye, which can be found at most local craft stores. It is oil-based, and mixes into candy beautifully. Its actually marketed as their “pastel” collection, however keep adding more dye for an intense neon-like hue.

*For more detailed instructions on using neon dyes, click here.


Chips and Dip - 3 Yummy Treats!

EXTRAS, RECIPESKim & ChloeComment

Recipe from Kayla, PopCosmo’s Teen Chef: Chips and dips are a summer favorite when friends stop by or when you need an afternoon snack. They are perfect when watching the Olympics and you need  a special treat everyone can snack on while cheering for their favorite athlete! Kayla's helping you cook up some great chips and dips that put restaurant offerings to shame. Happy and healthy snacking! GUACAMOLE Just about everybody has tried this Mexican restaurant staple with chips and dips, and for good reason! It is creamy, fresh, and bright! I wanted mine to have some texture so that it wasn't spiced avocado puree, so I only smashed half of the avocados and added the rest in chunks at the end. I also added some red onion, garlic, jalapeño, lime juice, and spices. I know that you either love or hate cilantro, so it is completely optional. In fact, you can adjust the amounts of all of the ingredients to fit your taste. You can even add in other ingredients like tomatoes, chili powder, and bell peppers. This is a very simple recipe that can be changed to fit anyone's taste! guacamole recipe

2 Ripe Haas Avocados 1 T Minced Red Onion 1 Clove Garlic, Minced 1/2 - 1 Jalapeño, Seeded & Minced 2 T Chopped Fresh Cilantro 1 T Lime Juice 1/4 tsp Cumin

Remove the pits from the avocados; peel. Cut into large chunks and mash half until smooth. Stir in the onions, garlic, jalapeño, and cilantro. Season with salt, pepper, and the cumin. Fold in the remaining avocado chunks until combined but still chunky. Stir in the lime juice. Recipe Adapted from Cook's Illustrated

PINEAPPLE MANGO SALSA This is not your typical salsa. It is very tropical chunky, and more sweet than tomato-based salsas. It has a lot of variety, too; no bite is ever the same. There is the sweetness of the pineapple, sharpness of the onion and ginger, spiciness from the jalapeño, and tanginess from the lime juice. I grill the pineapple to bring out some of the natural sweetness in addition to adding a bit of charred (but not burnt) flavor. Since it is sweet and spicy, I use it on more than just chips. This salsa is fantastic on fish, grilled chicken, shellfish, and more. As with most salsas, you can always adjust the ratios of the ingredients to fit what you prefer. This salsa is as delicious as it is unique! mango salsa recipe

1 Pineapple 2 T Oil 2 Mangos 1 Red Bell Pepper 1 Red Onion 1/3 Cup Chopped Fresh Cilantro 1/3 Cup Olive Oil 2 T Fresh Grated Ginger 2 Jalapeños 3 Limes 4 tsp Sugar

Peel and core the pineapple. Cut into 1/4" thick rings and brush with the oil. Grill until grill marks appear. Peel and pit the mango. Dice. Dice the bell pepper. Mince the onion and jalapeño. Dice the pineapple rings once cool. Whisk the olive oil, ginger, the juice of the limes, and the sugar together. Combine the pineapple, mango, bell pepper, onion, cilantro, and jalapeños. Stir in the olive oil mixture and let sit overnight before serving. Recipe Adapted from Susanna Goihman

CORN & TOMATO SALSA I love this recipe because it has all of the flavors of summer. It is one of the best ways I know to use the sweet summer corn and perfectly ripe tomatoes. It is an unbelievably easy recipe but is still quite unique. The only ingredient you have to cook is the corn, and even that step isn't that complicated. You simply remove the kernels from the cob and cook it in hot water for a few minutes. Removing the kernels can be a bit daunting, but it really is simple. I place a small bowl upside-down in a larger one, hold the corn on the base of the small bowl, and cut the kernels off with a large, sharp knife. The large bowl catches the kernels and the juice, and the small bowl gives you leverage. This recipe is a delicious twist on the usual tomato salsa! salsa recipe

3 Ears Yellow Corn 1/4 tsp Baking Soda 1/2 tsp Salt 2 T Lime Juice 1 T Oil 1 tsp Honey 1 Tomato, Diced 3 T Minced Onion 1 Jalapeño, Seeded & Minced 2 T Chopped Fresh Cilantro

Bring 2 cups water to a boil in a deep pot over high heat. Stir in the corn kernels, baking soda, and 1/4 tsp salt. Remove from heat and let stand for 10 minutes. Drain and let cool. Combine the lime juice, oil, honey, and 1/8 tsp salt. Add the corn, tomato, onions, jalapeño, and cilantro. Toss to combine, then season with pepper and the remaining salt. Recipe Adapted from Cook's Illustrated

BAKED TORTILLA CHIPS The calories really add up if you shovel in delicious salsa with fried tortilla chips. Since I'm not very enthusiastic about sacrificing my chips and dip, I decided to find a healthier alternative. This baked tortilla chips couldn't be easier, and they are exponentially better than the fried ones. To make them crispy, I do toss them in a bit of oil, but a few spoonfuls is much better for you than deep frying them in it. These are the perfect accompaniment to any dip, especially salsa! tortilla chips recipe

1 lb 6-8" Thin Yellow Corn Tortillas 1/4 Cup Oil

Heat oven to 425F. Line cookie trays with foil. Cut the tortillas into six wedges each. Spread onto the prepared trays and toss in the oil. Bake the chips for 5 minutes, flip, and cook for another 5 minutes. Season immediately with salt and pepper.

For more delicious recipes by our Teen Chef, Kayla, check out her blog, The Nerdy Chef! 

Fruit Pie Recipe: Light & Refreshing

EXTRAS, RECIPESKim & ChloeComment
Berry-Yogurt-Pie-11.jpg

Recipe from Kayla, PopCosmo’s Teen Chef: This fruit pie is light, refreshing, and a wonderful alternative to traditional baked fruit pies. It consists of a crunchy granola crust, creamy yogurt and cream cheese filling, and a big pile of fresh berries. I chose raspberries and blueberries since it is the 4th of July and I wanted a red, white, and blue fruit pie, but you can use whatever fruit you have; it doesn't even have to be berries! The filling pairs perfectly with almost any fruit, so use what you like most. I use granola for the crust instead of my usual pie crust recipe because it doesn't absorb too much of the liquid from the filling. You can make your own or buy some; I prefer plain granola so that it doesn't overwhelm the rest of the pie and isn't too chunky.The crust is easier to press into the pan when it is ground almost to dust, but that process takes away from the variety of textures and flavors of the granola. I only pulse some of the granola in a food processor and add the rest later so that it can be pressed into the pan while retaining the chunkiness of the original granola.

The filling is so velvety and tangy; it works well with just about all kinds of fruit. I use vanilla yogurt to keep the flavor fairly neutral, but you can experiment with different yogurts. However, I would not recommend using greek yogurt because it has a noticeably different texture and sugar content. Since yogurt is a bit too thin to use as a filling on its own, I add some cream cheese. It boosts the tanginess of the yogurt and makes the texture perfect! Another key to the texture is to drain some of the liquid from the yogurt. I prefer cheesecloth, which is available at cooking stores and some grocery stores, but a few layers of paper towels placed in a fine-mesh strainer will work if necessary.

This fruit pie is an amazing summer dessert because it is so refreshing and tangy! I love the contrasting textures and bright, fresh flavors, and I'm sure you will, too!

fruit pie recipe

Fruit Pie

Make 1 9" Pie, Recipe Adapted from Martha Stewart

1 1/2 Cups Granola 1/4 Cup + 3 T Sugar 1/2 tsp Cinnamon 6 T Butter, Melted 1 Cup Yogurt 8 oz Cream Cheese, Softened 1 tsp Vanilla Pinch Salt 1 1/2 Cups Fresh Fruit

Heat oven to 350F and grease a pie plate.

Pulse a cup of granola with 1/4 cup sugar and cinnamon in a food processor until fine. Drizzle in the butter, then add the remaining granola.

Press the granola mixture into the pie plate. Chill until firm, about 15 minutes. Bake until golden and fragrant, about 10 minutes. Cool.

Place the yogurt in cheesecloth or a paper towel-lined sieve over a medium bowl. Let sit for 30 minutes and discard the liquid.

Beat the cream cheese until smooth and fluffy. Add the remaining sugar, salt, and vanilla. Add the strained yogurt and beat until smooth.

Pour the yogurt mixture into the crust and chill until set, about 6 hours. Top with the fruit. Serve & enjoy!

For more delicious recipes by our Teen Chef, Kayla, check out her blog, The Nerdy Chef!


A simple recipe to make Chocolate Lollipops

EXTRAS, RECIPESKim & Chloe3 Comments

When we heard about the chocolate lollipops that Karyn, the Pint Sized Baker was creating, we knew we had to check them out. Chocolate is our passion, and who doesn't love a lollipop. What we saw blew us away! And when she agreed to share her recipe with us, we were so excited to share it with you... and we couldn't believe how super-simple making chocolate lollipops could be. Guess who will be bringing them as treats ... well... everywhere?!  Teacher gifts? Check! Sick friend? Check! Party favor? Check. And it will be our secret how easy they are to make! chocolate lollipops

Hi - I'm Karyn, the Pint Sized Baker. I've been baking and cake poppin' for over a year and I can't get enough of it.   I have a bunch of ideas on my blog, PintSizedBaker.blogspot.com , more pictures on my FaceBook page and a few videos on my YouTube channel.

Kim, from KC Bakes, already shared a tutorial with you about how to make cake pops. When you are ready, I have tutorials on my blog about taking those Cake Pops to the next level by adding candies and decoration to really make each one special and unique for any occasion.

However, if cake pops really aren't your thing, there are so many other treats that you can make on a stick! On my blog, I show you how to make brownies on a stick, chocolate wontons on a stick, and easy lollipops with candy melts and candy or dried fruit. They can be so much fun to make with your favorite sweets. I'm going to share my lollipop recipe with you now, and it's so simple.

chocolate lollipops 2

Here's what you'll need:

  • melted Candy Coating (any color or flavor)
  • lollipop sticks
  • dried fruit, candy, nuts - basically anything that tastes good coated in chocolate
  • wax paper lined cookie sheet

Here is what I used:

  • Dried Kiwi
  • Dried Pineapple
  • Dried Mango
  • Dried Papaya
  • Almonds
  • Gummi Bears, Sour Patch Kids, and Nerds
  • Chocolate and White Candy Coating

chocolate lollipops

And, here's what you do:

  • Pour a small amount of melted chocolate on to the wax paper. Not too much, just enough for a 2-inch circle.
  • Roll 1-inch of the lollipop stick in the chocolate coating and then let lay flat.
  • Add toppings before it hardens.

bitten lollipop

I also swirled some white and chocolate for some extra fun!

Enjoy! Have a Scrumptious Day!


Cake Pops - how to make the best ever!

EXTRAS, RECIPESKim & Chloe30 Comments

Our entire family loves cake pops, and Chloe loves to make them for her friends. She's made them for parties, teachers, friends, and classes at school for years. Most of her friends are now baking cake pops themselves, which means she's also a great teacher! But for this tutorial, we turned to our friend Kim of KC Bakes. We are honored to have her share her tips and awesome photos with us for a set-by-step cake pop tutorial. And we are delighted that we can help you get started with a hobby, a fun day in the kitchen, or turn your baking into a profit-making venture this summer!  And we also have more sweets on a stick with a recipe for a super-simple chocolate lollipop... Hi everyone, I’m Kim, founder of KC Bakes. A few years ago, I wanted to order a cool custom cake for my husband’s birthday. But after calling around to a few bakeries, I couldn’t afford the high bakery prices for all of that fancy fondant work. One of my favorite shows is Project Runway, so in a true Tim Gunn “make it work” moment, I Googled how to make fondant, baked hubby a really cool cake and started off on an accidental baking journey. Then when cake pops popped onto the baking scene, I had to try those too! In this tutorial, I’ll share my tips and tricks for basic cake pops. They’re easy to do, and really fun to make with a group of friends.

Ingredients • Baked cake, fully cooled • Cake frosting • Two bags of white candy melts • One bag of red candy melts

Supplies • Cake Pop Sticks • 1.5” cookie scoop (like this) KC Bakes Cake Pop Stand (or Styrofoam) • Ziploc sandwich bag

Cut your cooled cake into smaller pieces.

cut cake

For best results, hand-crumble the entire cake. Some bakers like to use a food processor to crumb the cake. While it’s definitely quicker, I’ve found that process limits the amount of cake pops that you can get in one batch. The problem is that it makes the cake crumbs too fine, and when you mix in the frosting, the fine crumbs get absorbed into the frosting, rather than binding together. Your crumbs should look like this…

cake crumbs

Mix in about 1/3 of the can of frosting, and remember these three words: less is more. You can always add more frosting later, but if you add too much up front, you’ll not be able to correct it.

add frosting

A good way to test if your cake mix is moist enough is if it holds its shape when you squeeze it in your hand. Try rolling it into a ball – if it stays together, you are good to go. If it starts to fall apart, mix a little more frosting into the cake mix.

cake pop

Pack the cookie scoop full with the cake mix – similar to how you pack brown sugar into a measuring spoon, smush it in there nice and tight. Using a cookie scoop is a very effective way to get your cake balls to be consistently all the same size.

measuring cake pops

I like to scrape the scooper against the side of the bowl to make sure it’s fully packed. After ejecting the cake ball, you’ll see it’s a little rough-looking. Squeeze it a few times in your hand, then roll it into a smooth ball.

rounding

A standard 13”x9” boxed cake will yield about 36-40 cake balls. If the cake is overcooked, the edges can get too hard, and it will limit the amount of fluffy cake to turn into pops.

get ready!

Divide your cake balls onto smaller plates and place them into the refrigerator for about 10 minutes or so, just enough to chill them. I leave them in there until I’m done melting the candy melts in the next step, and that timeframe works great. If they are left in there for too long, the cake balls tend to split when the stick is inserted.  Having the cake balls divided onto smaller plates will help you in the dipping process. If you bring all of the cake balls out of the fridge at the same time, they will soften up as they rise to room temperature, and likely fall off of the stick when dipped. Place your candy melts into a microwave-safe bowl and melt according to the package directions.

It’s very important not to overheat your candy melts. The ideal consistency should flow smoothly off of a spoon. If it drops off thick or in clumps, it’s likely been overheated. In this case, try mixing in some cooking oil – again, less is more – add it in little by little, until you reach a good consistency.

candy melt 2candy melts 1

Bring a plate of cake balls out of the fridge. Dip the tip of the lollipop sticks into the melted candy, and insert them into the cake balls. Return that plate to the fridge, and repeat until all of the cake balls are finished.

Bring your first plate back out from the fridge. Holding the pop straight up and down, submerge it into the candy melts.

dip

Lightly tap the stick against the bowl to remove all of the excess chocolate.

cake pop

Place the cake pop into your KC Bakes stand (or Styrofoam) to allow the pop to dry.

cake pop stand

Melt a small amount of candy melts for your drizzle.

candy

For an easy and mess-free way to fill your Ziploc bag, line a small cup with the bag. Pour in the melted candy, get most of the air out of the bag, and seal the zipper.

pop

The temperature of your candy melts is important during this step. If it’s too hot, it will cause your cake pops to split open. Allow it to cool slightly, until its lukewarm.

plain

Snip a very small tip off of the corner of the bag, and drizzle the melted candy in a zig-zag pattern across the pops.

cake pop finished

Ta daaaaaa. Cake pops!

If you’re feeling adventurous, we have a variety of tutorials on our website to teach you other decorating techniques such as side drizzle pops and cupcake pops:

side drizzle popscupcake pops


Enjoy!

@popcosmo on Instagram

A Taste of Summer: Blueberry Cake

EXTRAS, RECIPESKim & Chloe1 Comment

Blueberry cake recipe from Kayla, PopCosmo’s Teen Chef: Every summer around summer solstice, my family and I go berry picking. It really makes me appreciate where food comes from, and it makes whatever I cook that much more special. This year, we picked 18 pounds of berries, so I decided to make this delicious blueberry cake, a breakfast treat bursting with fresh blueberries to celebrate the start of summer. It has three layers: a moist, light cake, a layer of sweet blueberries, and a crumbly topping. Well, it started out with three layers. I found that mine marbled together when the cake rose, but it made everything taste even better. Each bite had a little bit of everything, and the flavors complemented each other perfectly. If you are concerned about keeping the layers separate, let the cake cook part of the way before adding the blueberries and crumble topping. Whether you want to call this blueberry cake a coffee cake or crumb cake, either way, it will taste fantastic! I have found that most of my favorite cakes have a liquid component that is thicker than just milk or water, like cream cheese or, in this case, sour cream. It adds texture and moisture in addition to a slight tang, so it really is a great ingredient.

Whenever I use add-ins like fruit, chocolate chips, or nuts, I like to toss them in flour or cornstarch. It coats whatever I mix in and prevents them from sinking too much. In this recipe, the blueberries would sink to the bottom of the cake instead of marbling throughout. The juices would also burst out of the berries while the cake bakes and turn the whole thing purple. I don't want all the berries at the bottom or a purple cake, so I make sure to toss it in some flour. In this recipe specifically, I use the flour mixture that I mix into the cake.

As for the streusel, I wanted it to have a slight cinnamon flavor, but not so much that it would overpower the berries or the cake. I add just enough to give the cake some warmth without being a primary flavor. After mixing the streusel together, I keep it chilled so that it crumbles more easily. When I break it into chunks, I try to keep them small so that I don't have lumps of streusel on top. It does melt together a bit so it's not a huge deal, but its so easy to do that I make the lumps small anyway.

I love this blueberry cake recipe because it is a great breakfast, snack, or dessert. It is so fresh, and it captures all the great flavors of summer.

blueberry crumb cake recipe

Blueberry Cake, makes a 9" square, about 16 bars, adapted from Tish Boyle

3 Cups Flour 1 1/4 Cups Sugar 1/3 Cup Dark Brown Sugar 1 tsp Cinnamon 1/4 + 1/8 tsp Salt 7 T Butter, Melted 10 T Butter, Softened 1 1/4 tsp Baking Powder 1/4 tsp Baking Soda 1 3/4 Cups Fresh Blueberries 1 Cup Sour Cream 1 1/2 tsp Vanilla 2 Eggs

Combine 1 1/2 cups flour, 1/4 tsp sugar, brown sugar, cinnamon, and 1/8 tsp salt. Add the melted butter and stir until crumbly.

Heat the oven to 350F and line a 9" square pan with parchment; grease.

Whisk the remaining flour, baking powder, baking soda and salt together. Toss the blueberries with 2T of the mixture. Combine the sour cream and vanilla. Beat the butter and remaining sugar together until fluffy. Beat in the eggs. Add the flour in three additions, alternating with the sour cream in two additions.

Scrape the batter into the prepared pan. Spread the blueberries on top, sprinkle with the crumb topping, and bake for 45 minutes or until cooked through. Alternately, spread the batter into the prepared pan, bake for 10 minutes, top with the blueberries and crumb topping, and bake for 35 minutes or until cooked through.

Enjoy!

For more delicious recipes by our Teen Chef, Kayla, check out her blog, The Nerdy Chef!

blueberry crumb cake


Simple Recipe for Creme Brulee? Yep!

EXTRAS, RECIPESKim & Chloe4 Comments

Recipe from Kayla, PopCosmo’s Teen Chef: Creme Brûlée is my dad's absolute favorite dessert, so I like to make it for him for Father's Day. For anyone who has never tried it, it is a creamy vanilla custard baked in individual ramekins and topped with crunchy caramelized sugar. Ideally, the texture of the custard is somewhat gelatinous and springy (but not as firm as jello) and is topped with a thin, crispy sugar shell. To achieve this caramel layer, most restaurants use a kitchen torch, but most people don't have one. I found that placing them on a rack as close to a broiler as possible caramelizes the sugar without ruining the dish. I also use coarse, dark turbinado sugar instead of regular sugar to speed up the process. As for the custard, the recipe calls for vanilla extract, but you can use the seeds from half of a vanilla bean to make it even more special. I like this recipe specifically because it only makes two. However, if you need to make more, simply double, triple, or quadruple the recipe. This dessert is elegant and surprisingly simple; it is sure to be amazing! creme brûlée recipe

Creme Brûlée Makes 2, Recipe Adapted from Cook's Illustrated

1 Cup Cream 2 T Sugar Pinch Salt 3 Egg Yolks 1/2 tsp Vanilla 1 T Turbinado Sugar Berries, Whipped Cream, etc. for Garnish, Optional

Heat oven to 300 degrees F and adjust rack to lower-middle position. Place a towel in a deep baking dish and put two ramekins on top.

Combine 1/2 cup cream, sugar, and salt in a small saucepan. Bring to a boil over medium-low heat, stirring often. Stir in the remaining cream once cooled slightly. Combine the egg yolks, vanilla, and 1/4 cup cream mixture. Whisk in the remaining cream.

Strain the custard into the ramekins to remove any bits of cooked egg. Pour enough hot water into the pan to come two-thirds of the way up the ramekins.

Bake for 30-40 minutes or until barely set in the center. Cool to room temperature, then cover with plastic and chill for at least four hours or until cold.

Wipe off any condensation and sprinkle with the turbinado sugar. Brown with a kitchen torch or broiler until caramelized, then top with berries, whipped cream, etc. if desired.

Serve!

For more delicious recipes by our Teen Chef, Kayla, check out her blog, The Nerdy Chef!

Recipes for Zucchini Ricotta Crostada

EXTRAS, RECIPESKim & Chloe5 Comments
When Zucchini starts growing, everyone is looking for exciting new recipes for zucchini and our Teen Chef, Kayla has a wonderful recipe to share, a Zucchini Ricotta Crostada Recipe: This is the perfect appetizer for your Memorial Day celebration!? A crostada is basically a free-form pie, and this one can be served hot or cold.? It is full of fresh, bright flavors and a variety of textures. There is the crisp, flaky crust, the creamy ricotta cheese, and the succulent zucchini. ? You can add some more spices or herbs to the ricotta if you want to boost the flavor, but it tastes delicious as is! I use sour cream in the crust to keep it moist and slightly tangy. This recipe is simple, rustic, and delicious!
recipes for zucchini
Zucchini Ricotta Crostada, Recipe Adapted from Smitten Kitchen
1 1/4 Cups Flour
3/4 tsp Salt
1 Stick Butter, chilled
1/4 Cup Sour Cream
2 tsp Lemon Juice
1 lb Zucchini, sliced in 1/4" thick rounds
1 T + 1 tsp Olive Oil
1 Clove Garlic, minced
1/2 Cup Ricotta
1/2 Cup Grated Parmesan
1/4 Cup Shredded Mozzarella
1 Egg Yolk
  • Combine the flour and 1/4 tsp salt in the bowl of a food processor. Pulse in the butter. Combine the sour cream, lemon juice, and 1/4 cup cold water. Add to the dough and chill for an hour.
  • Spread the zucchini on a few layers of paper towels. Sprinkle with the remaining salt and let sit for 30 minutes, blotting occasionally.
  • Combine the oil and garlic. Combine the ricotta, parmesan, mozzarella, and 1 tsp garlic oil.
  • Heat oven to 400F. Line a cookie tray with parchment.
  • Roll the dough to a 12" round. Transfer to the parchment. Spread the cheese mixture over the dough, leavening a 2" border. Shingle the zucchini on top of the cheese and drizzle with the remaining garlic oil. Fold the edges of the dough over to cover part of the zucchini.
  • Combine the egg yolk with 1 tsp water. Brush over the edges of the crust and bake for 30-40 minutes or until the crust is golden and the zucchini is wilted.
For more delicious recipes by our Teen Chef, Kayla, check out her blog,? The Nerdy Chef!

Sticky Buns Recipe

EXTRAS, RECIPESKim & Chloe2 Comments

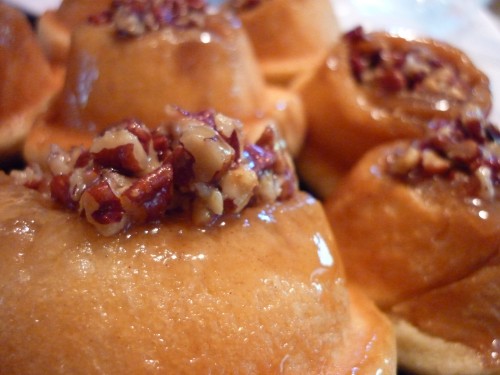
Recipe from Kayla, PopCosmo’s Teen Chef: This Sticky Buns Recipe will make your house smell SO good. Waves of fragrant cinnamon, sweet caramel, and toasty pecans fill the kitchen, and the scent makes this delectable breakfast taste even better! First of all, it's important to distinguish between cinnamon buns and sticky buns. Sure, cinnamon buns are delicious, but this sticky buns recipe is so much better when you bake them in gooey caramel and drown them in liquid pecan praline. I make them in individual muffin cups instead of cramming the buns into one tin because each one has some crunchiness, and you don't have to worry about unrolling them when you pull them apart. These are perfect for Mother's Day brunch because you don't have to get up really early in the morning to cook an elaborate breakfast; you can do everything the night before, stick them in the refrigerator after the second rise, and bake them in the morning. It'll be one of the best Mother's Day presents your mom will ever get! sticky buns recipe

Sticky Buns Makes 12, recipe adapted from Cook's Illustrated

3 Eggs 3/4 Cup Buttermilk 1/4 Cup Sugar 1 1/4 tsp + Pinch Salt 2 1/4 tsp Yeast 4 1/4 Cups Flour 6 T Butter, melted but cool 9 T Butter 3 T Butter, melted 2 tsp Cinnamon 1/2 tsp Nutmeg 1 3/4 Cups Light Brown Sugar 6 T Corn Syrup 2 T Heavy Cream 1 tsp Vanilla 3/4 Cup Chopped Pecans, toasted In the bowl of a stand mixer fitted with a paddle attachment, whisk eggs to combine. Add buttermilk. Whisk in sugar, salt, and yeast. Add two cups of flour and 6 T melted butter. Beat until just combined, then add in remaining flour. Knead with dough hook for five minutes. Knead by hand for one minute.

Transfer the dough to a large, greased bowl. Cover tightly with plastic wrap and let rise in a warm, draft-free area for 2-3 hours.

Meanwhile, combine 6 T butter, 3/4 cup brown sugar, 3 T corn syrup, heavy cream, and a pinch of salt in a small saucepan over medium heat. Cook until bubbling, then pour into a greased muffin tin.

Combine 3/4 cup brown sugar, cinnamon, and nutmeg. Roll the dough into a 16"x12" rectangle. Brush the dough with the 3 T melted butter and sprinkle with the cinnamon sugar. Roll into a cylinder and cut into 12 buns.

Place the buns into the cups. Wrap tightly with plastic wrap and let rise in a warm, draft-free area for 2-3 hours.

Heat oven to 350F and adjust the oven rack to lower-middle position. Bake the buns for 15 minutes or until lightly browned.

Meanwhile, coarsely chop the pecans. Combine 3 T butter, 1/4 cup brown sugar, 3 T corn syrup, and a pinch of salt in a medium skillet. Cook until bubbling and butter is melted. Turn off heat and stir in vanilla and pecans.

When the buns are finished cooking, invert onto a rimmed cookie tray. Place a spoonful of pecan topping onto each bun, and serve!

For more delicious recipes by our Teen Chef, Kayla, check out her blog, The Nerdy Chef!

Apple Muffins

EXTRAS, RECIPESKim & Chloe7 Comments

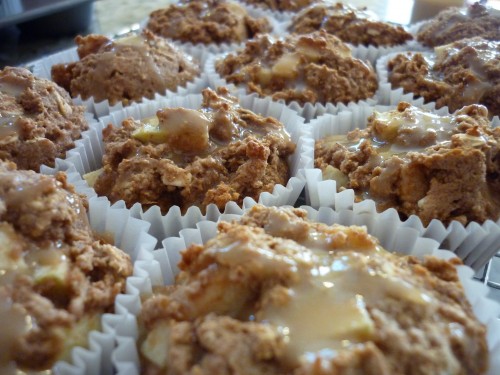
Recipe from Kayla, PopCosmo’s Teen Chef: Earth Day is quickly approaching, and that means its time to make some healthy, Earth-friendly recipes! These apple muffins are nutritious, vegan, and delicious! The word vegan, or containing no animal products, tends to trigger negative reactions, and health food conjures images of quinoa and tofu. Such ideas couldn't be more wrong, especially with this recipe! My crew of tasters had absolutely no idea that these apple muffins were vegan until I told them. In addition to tasting fantastic, this recipe is one of the healthiest I've ever made. It is completely fat-free and filled with chunks of apples, so the muffins are perfect for breakfast, snack, or dessert! apple muffins recipe vegan Apple Muffins makes 12 muffins, Adapted from The Happy Herbivore

1-1/2 Cups Whole Wheat Flour 1/2 Cup Oats 2 tsp Baking Powder 1 tsp Baking Soda 1/4 Cup Sugar 3 T Brown Sugar 2 tsp Cinnamon 1/4 tsp Ginger Pinch Salt 1 Cup Applesauce 1 Granny Smith Apple 1/2 Cup + 1 T Maple Syrup 1/2 Cup Powdered Sugar

Heat oven to 350F. Line a muffin tin with paper cups. Peel and core the apples. Cut into small cubes. Combine the flour, oats, baking powder, baking soda, salt, cinnamon, and ginger. Combine the applesauce, sugar, brown sugar, and 1/4 cup maple syrup. Fold in the flour mixture and apples. Scoop the batter into the prepared tins. They will be very full. Bake for 15-20 minutes or until cooked through. Meanwhile, sift the powdered sugar into the remaining maple syrup. Drizzle onto the apple muffins.

For more delicious recipes by our Teen Chef, Kayla, check out her blog, The Nerdy Chef!